Create product
Before you start adding products to your store we recommend you to check information by the link below:
Products - official documentationAdd product variants
Variants - official documentationYou may add in the product all supported variants by default: size, color, material
This options will work with: product item, quick view, product page
Additional functions
For more information we recommend you to check the video below:
inbuilt product editor *NEWAll options below can be added as unique parameter for each product via metafields
| Parameter | Options |
| Related Products | Separates custom collection with product for the best promotion |
| Countdown | Works on a product item and a product page |
| Video | Video link from some video channel |
| Icon Featured | Product item icon Custom Text |
| Icon New | Product item icon New. You can disable icon or show icon always |
| Icon Sale | Product item icon Sale. You can disable icon |
| Hover | Works with product items. In hover, you may see the second product image. Parameter - true/false |
| Custom Html | Placed on a product page after the price |
| Small Description | Placed on a Quick View. Default - main description |
| Product Thumbnail Description | Small description on product thumbnail in grid mode. Will work after product title |
| Size Chart | You may use a custom text or disable pop-up for the selected product |
| Shipping | You can use a custom text or disable popup for the selected product |
| Show Images | Show images only by selected variant |
How to use the inbuild product editor
INSTALL - ExIm App- Publish wokiee theme
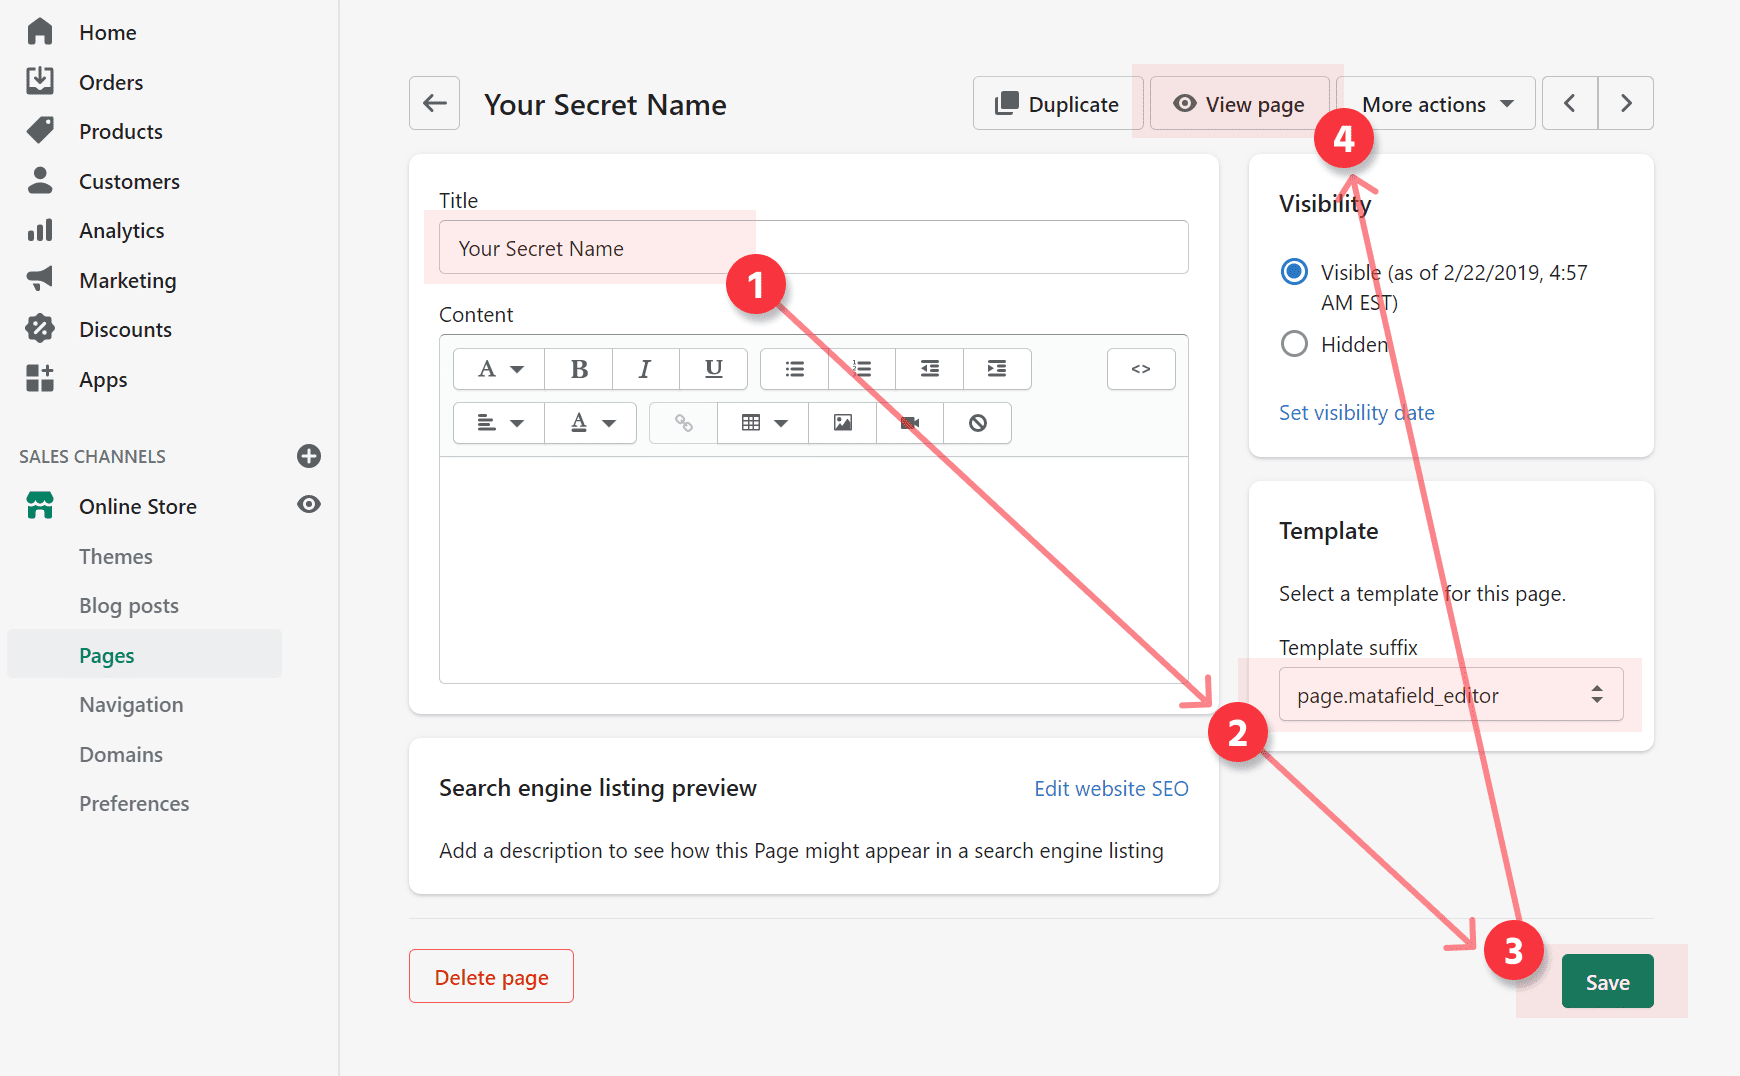
- Open page editor in admin panel.
- Create a new page with a secret name.
- Select the page template page.metafield_editor
- Save page
- Open the page with the Shopify default button View page

- Also, you may simplify the configuration of your products using the video below:
inbuilt product editor *NEW

Product page settings
In this section in your Admin Panel, you can make ALL CHANGES for your product: design, show/hide elements in the page, change tabs design, add trust badges, change variants swatches design. With product page section you may get all available designs of the theme.
Go to customize theme. Open product page. Edit product page section:

Settings:
-
Product page design: Default, Two columns, Thress columns

-
Product tabs design: Default, Full width tabs in column, Full width tabs in row
Tabs designs:
Tabs Description Type Options Default 
Full width tabs
in column
Full width tabs
in row
-
General options

-
Gallery settings / Gallery design

-
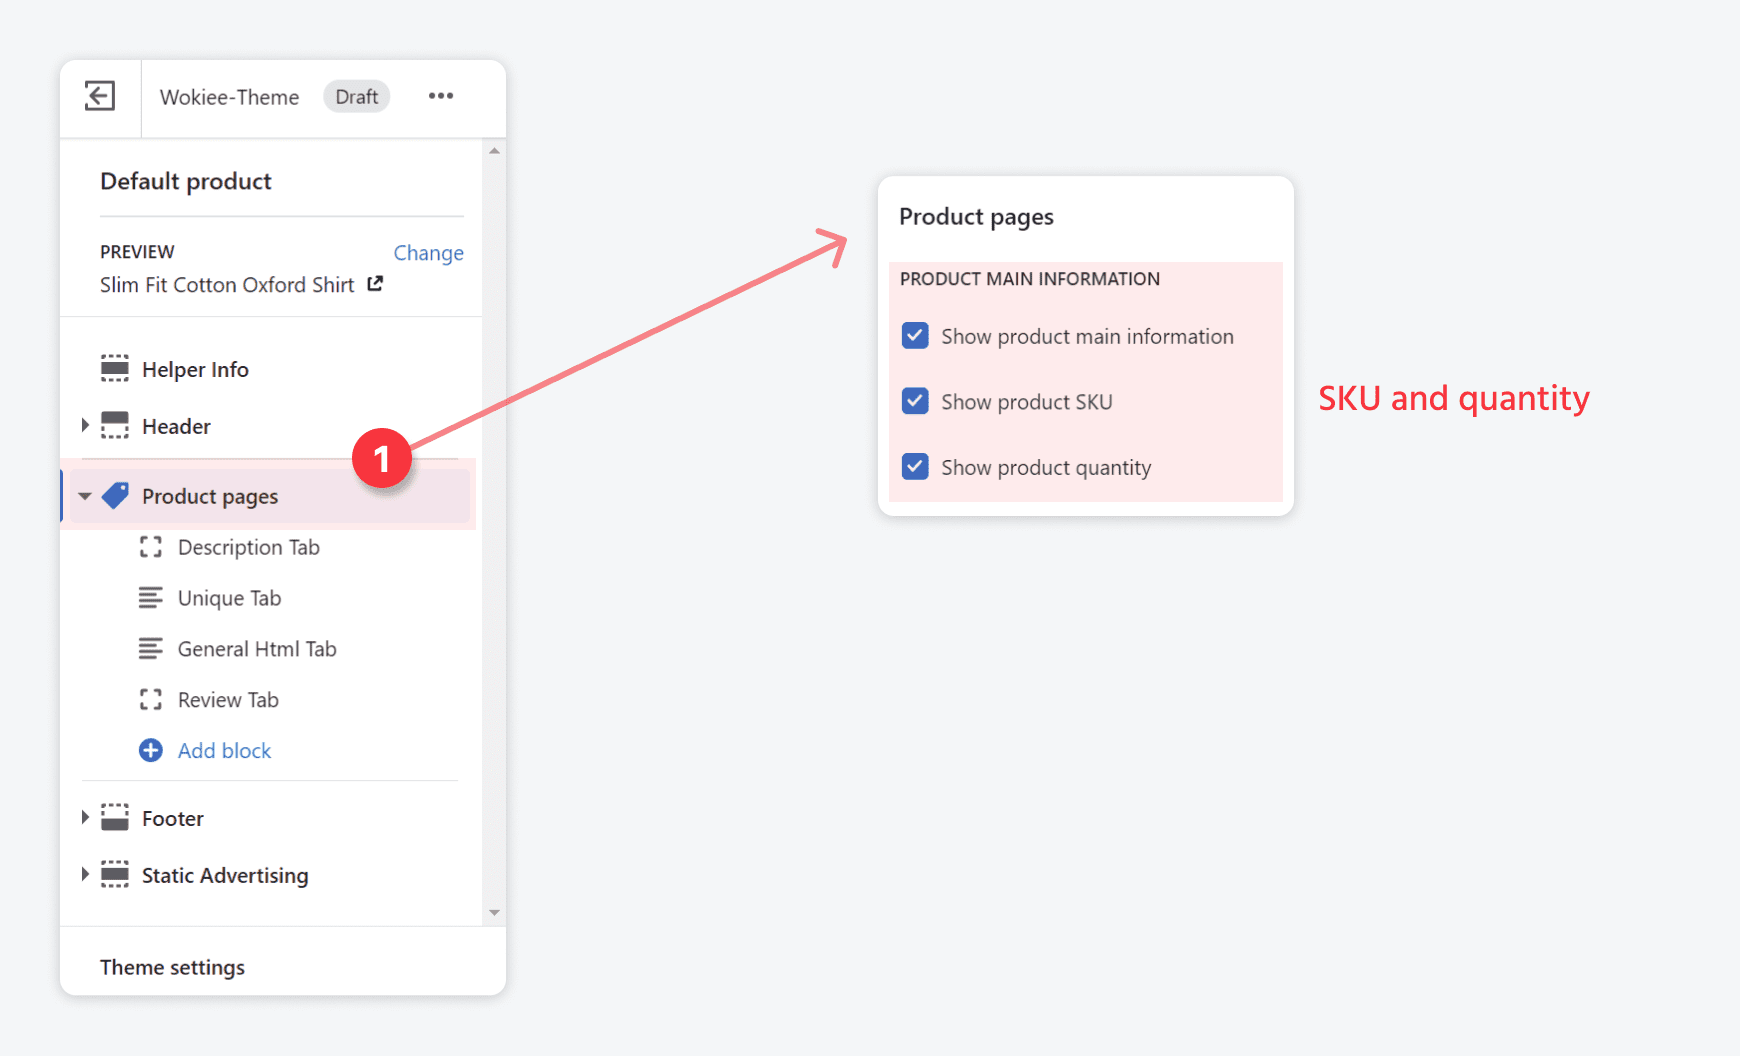
Product page main information: Product main blocks, SKU, quantity
-
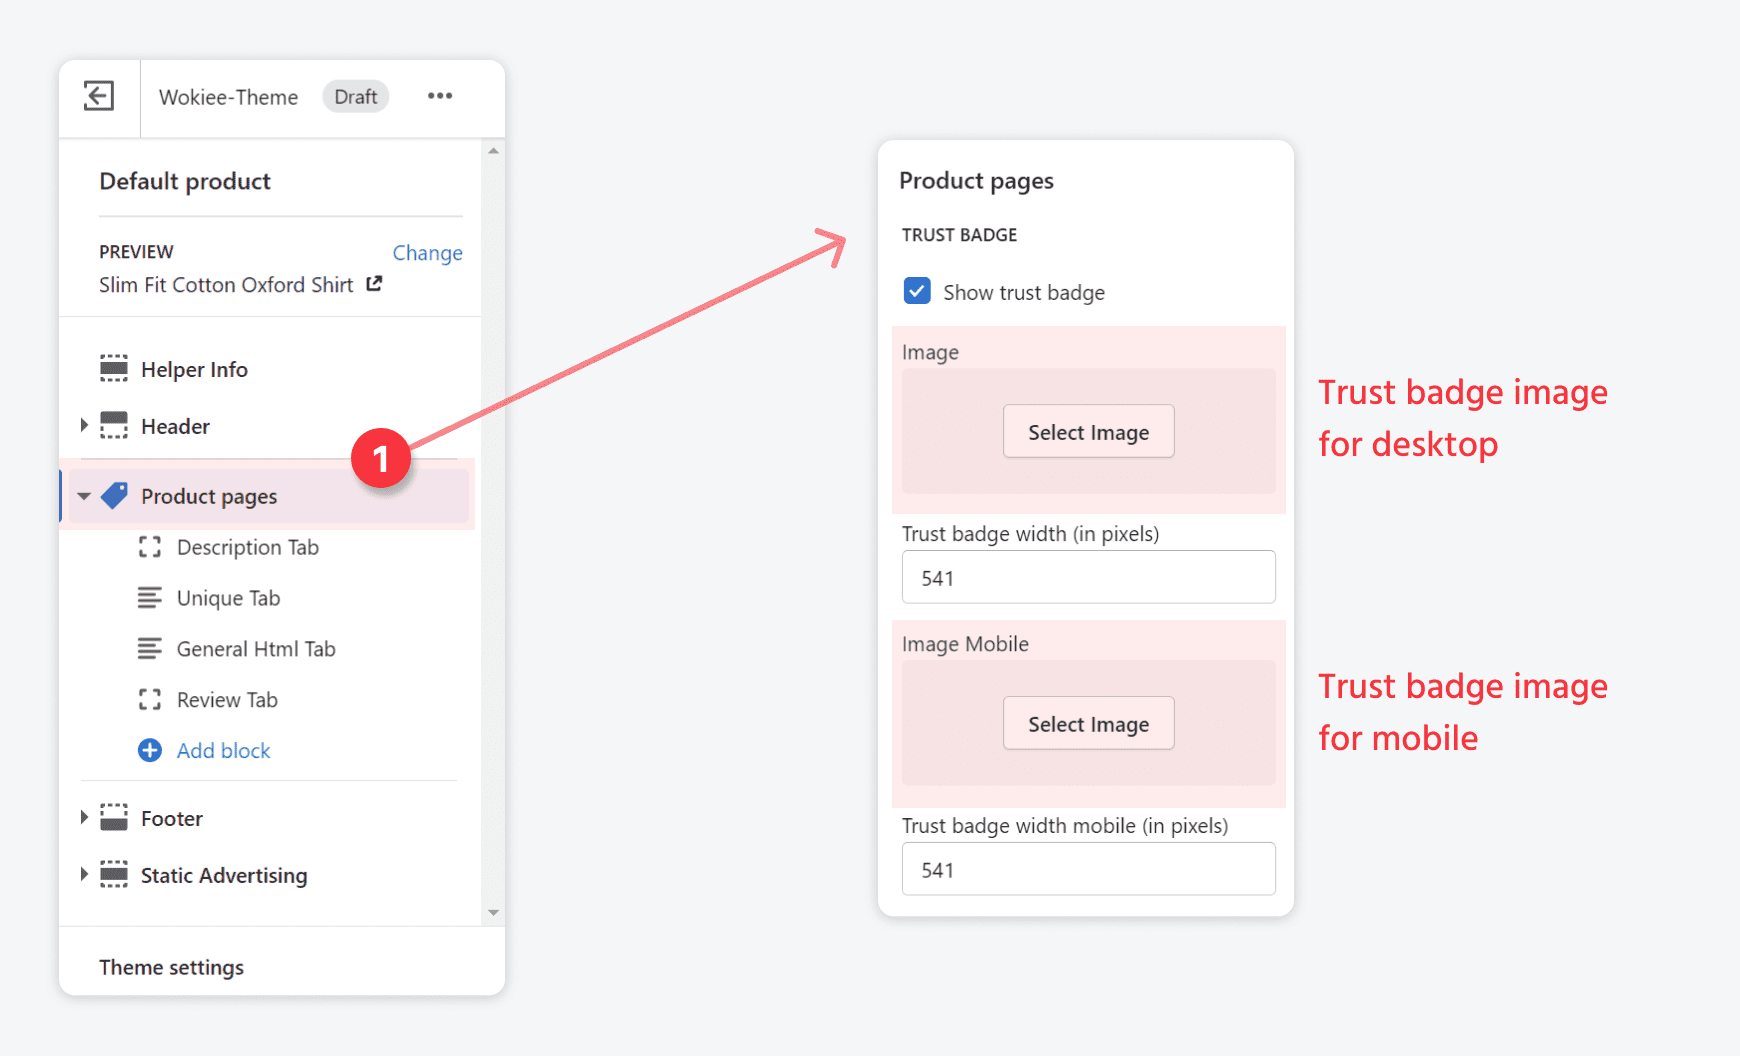
Trust badge image for desktop / mobile
-
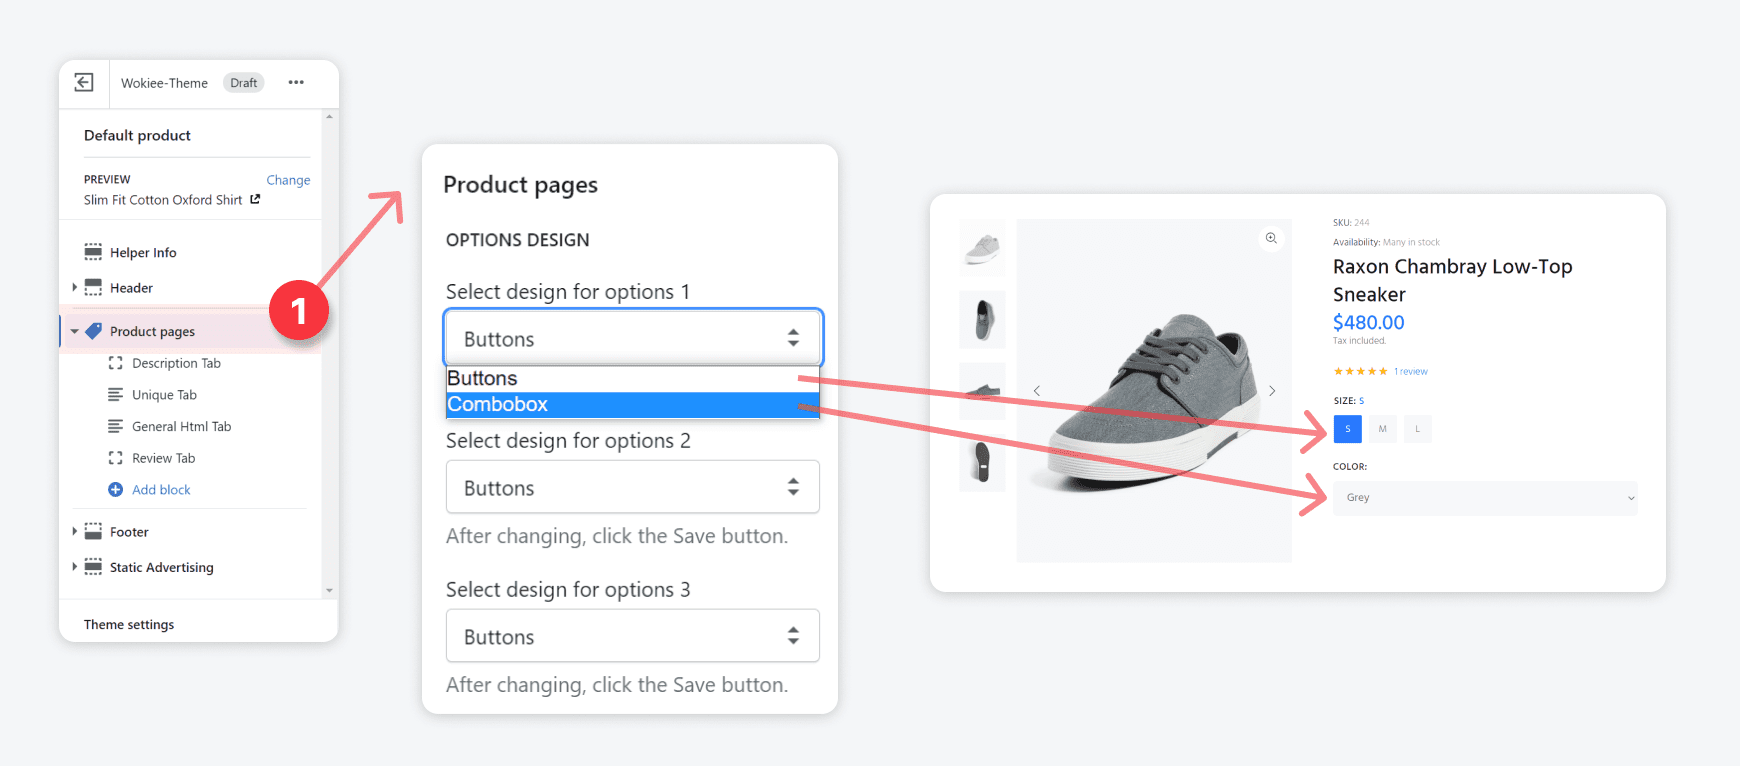
Options design: buttons / combobox

-
Product page text information: information, vendor, type, barcode, tags, popular product tags field, wishlist button, compare buttons

-
Popup: SIZE GUIDE
This content is common for all products. If you need a unique block work with metafields

-
Popup: Shipping information
This content is common for all products. If you need a unique block work with metafields

-
CONTENT
Go to customize theme. Open product page.
Sections -> Product pages -> CONTENT
In the section you can find settings for: Size Chart modal, Shipping modal, Message modal
In the section you can edit content for the page design PRODUCT PAGE - THREE COLUMNS
In the section you can enable CUSTOM RELATED PRODUCTS. These products work with metafield editor.
Related products are of 2 types:
Type old work with old shopify method by tags.
Type new work with new shopify documentation method.


Size chart modal html
GET THE MODAL CODE Size ChartShipping modal html
GET THE MODAL CODE SHIPPINGUnique tabs
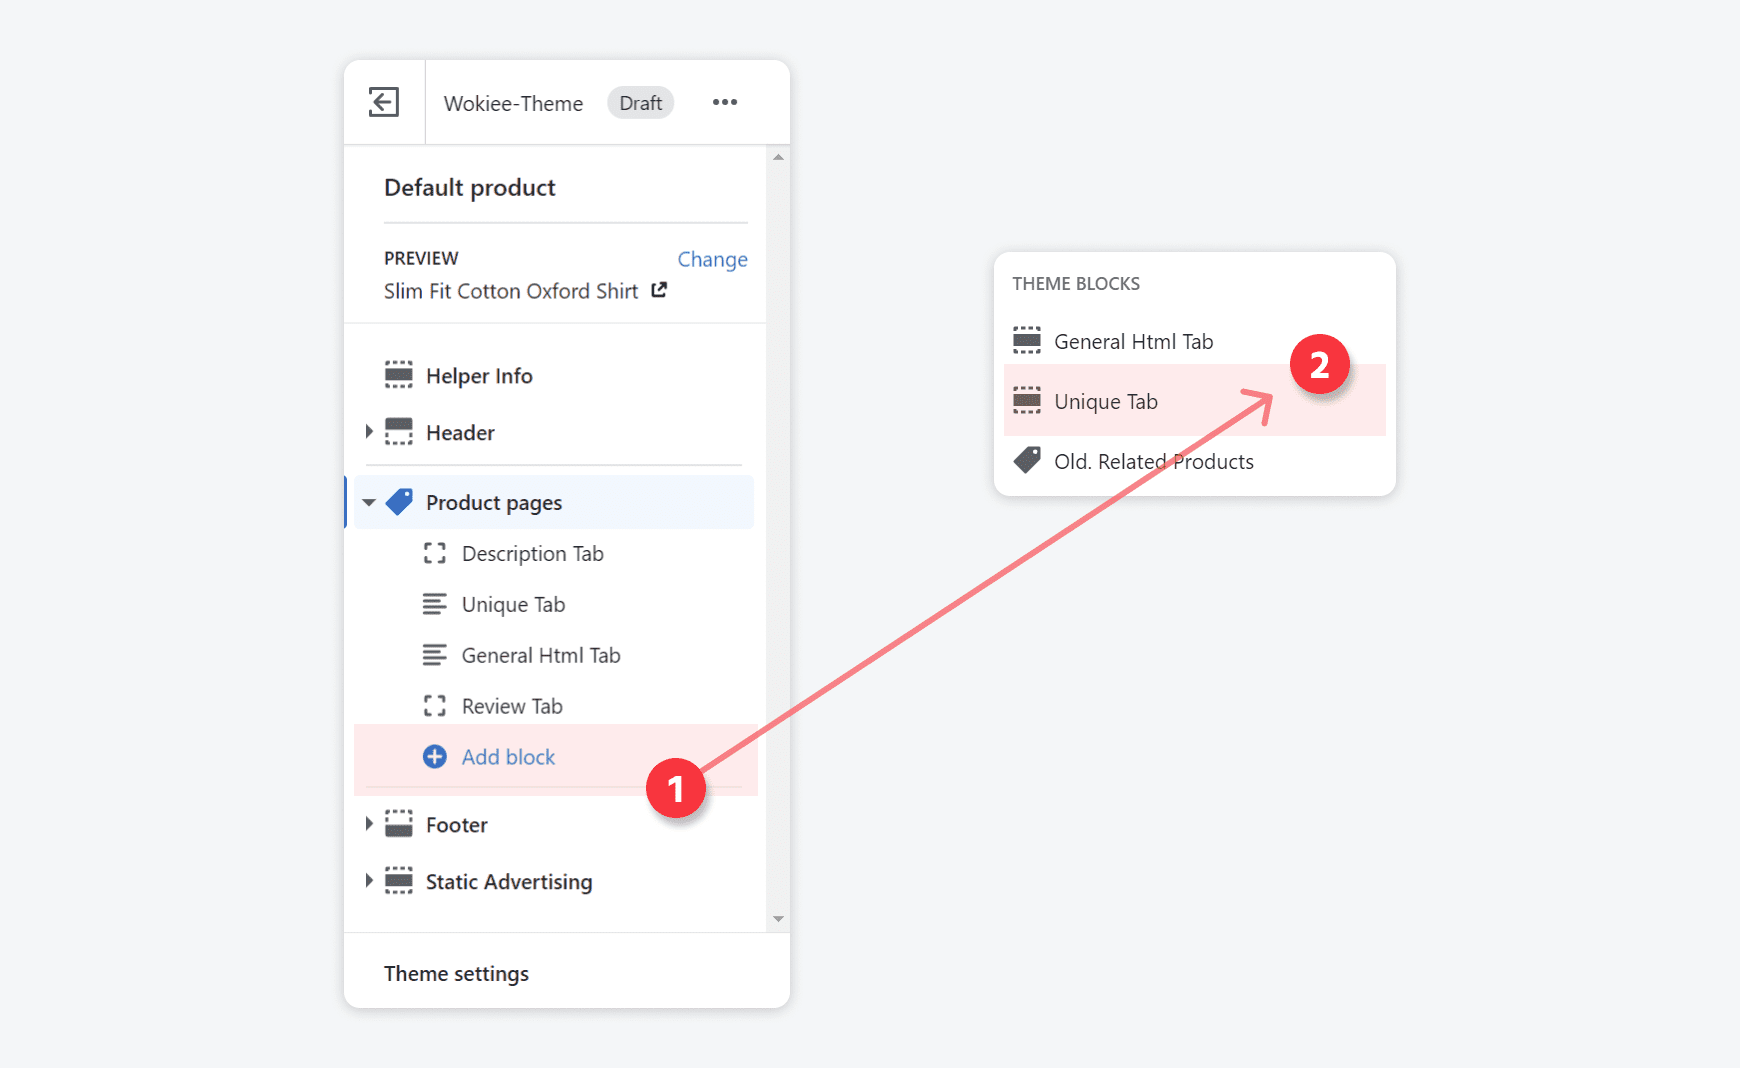
Unique Tabs- Go to Theme Customizer
- Open product page with Shopify menu
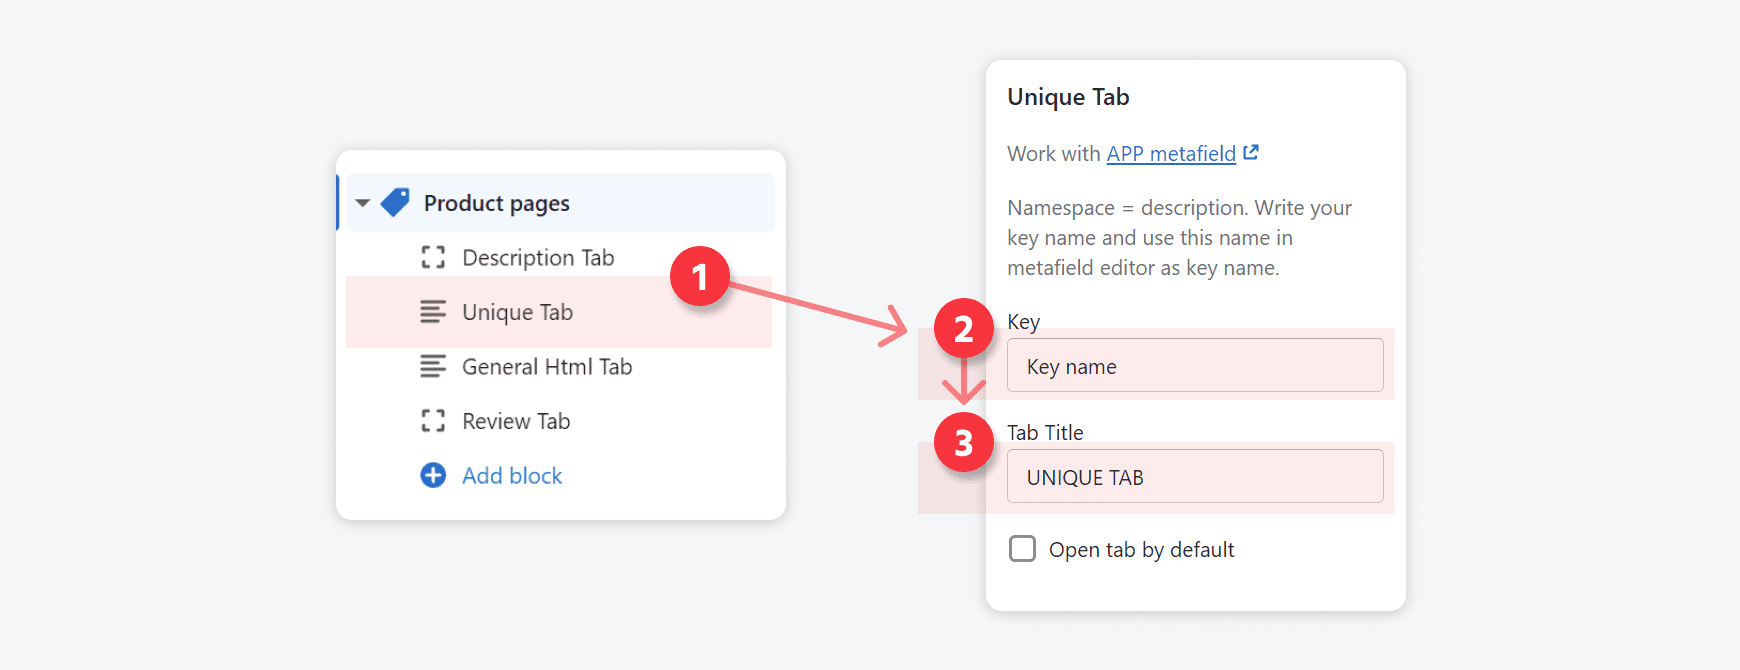
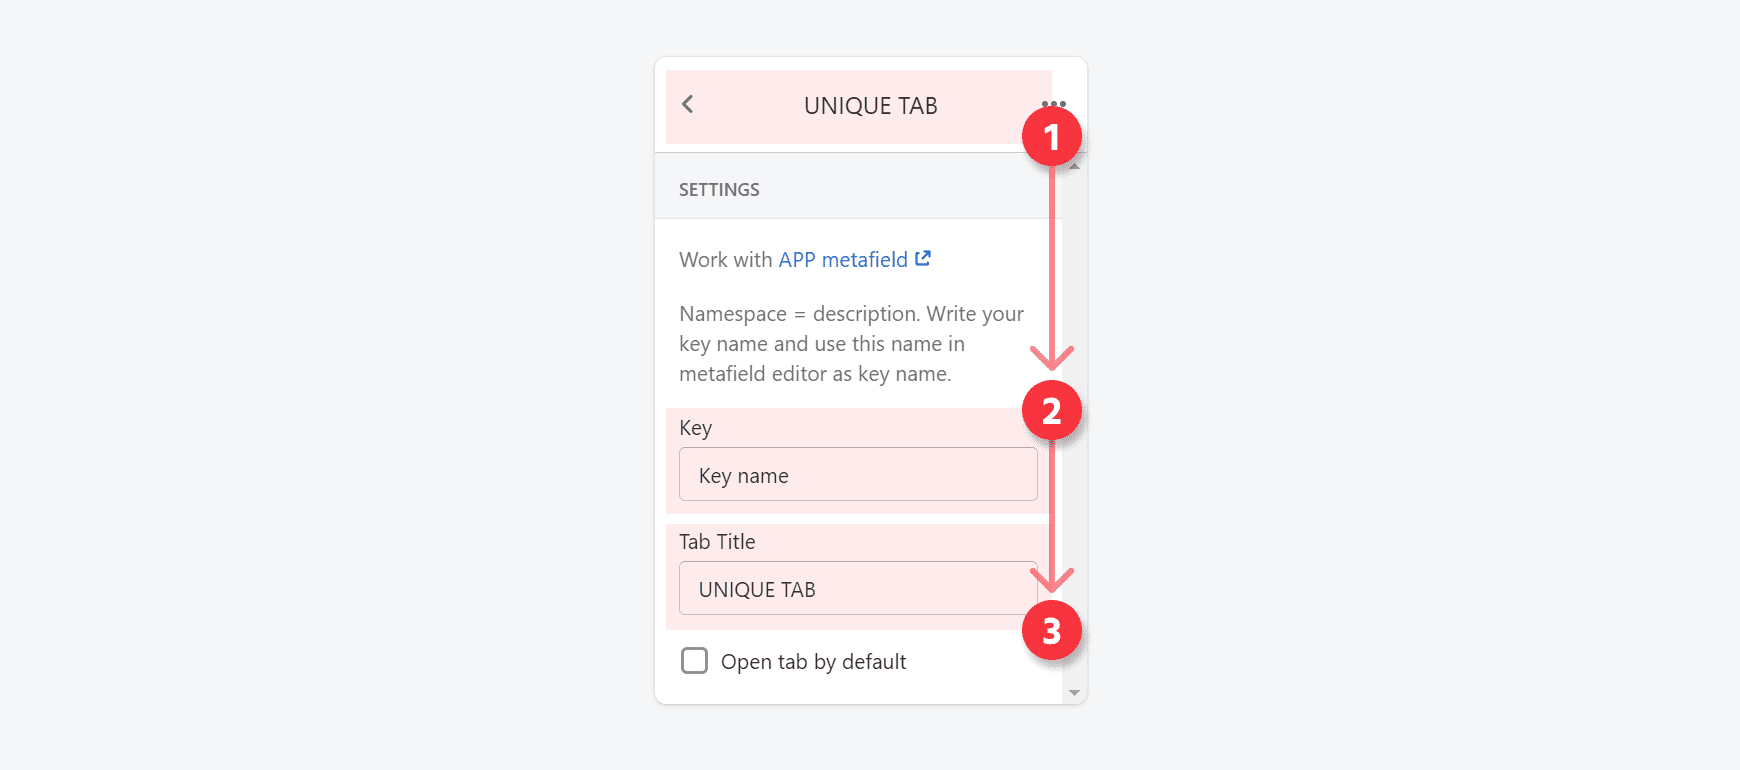
- Open settings section. Add the Unique tab in the section


- Add the key to the tab. Key will separate the product information with tab

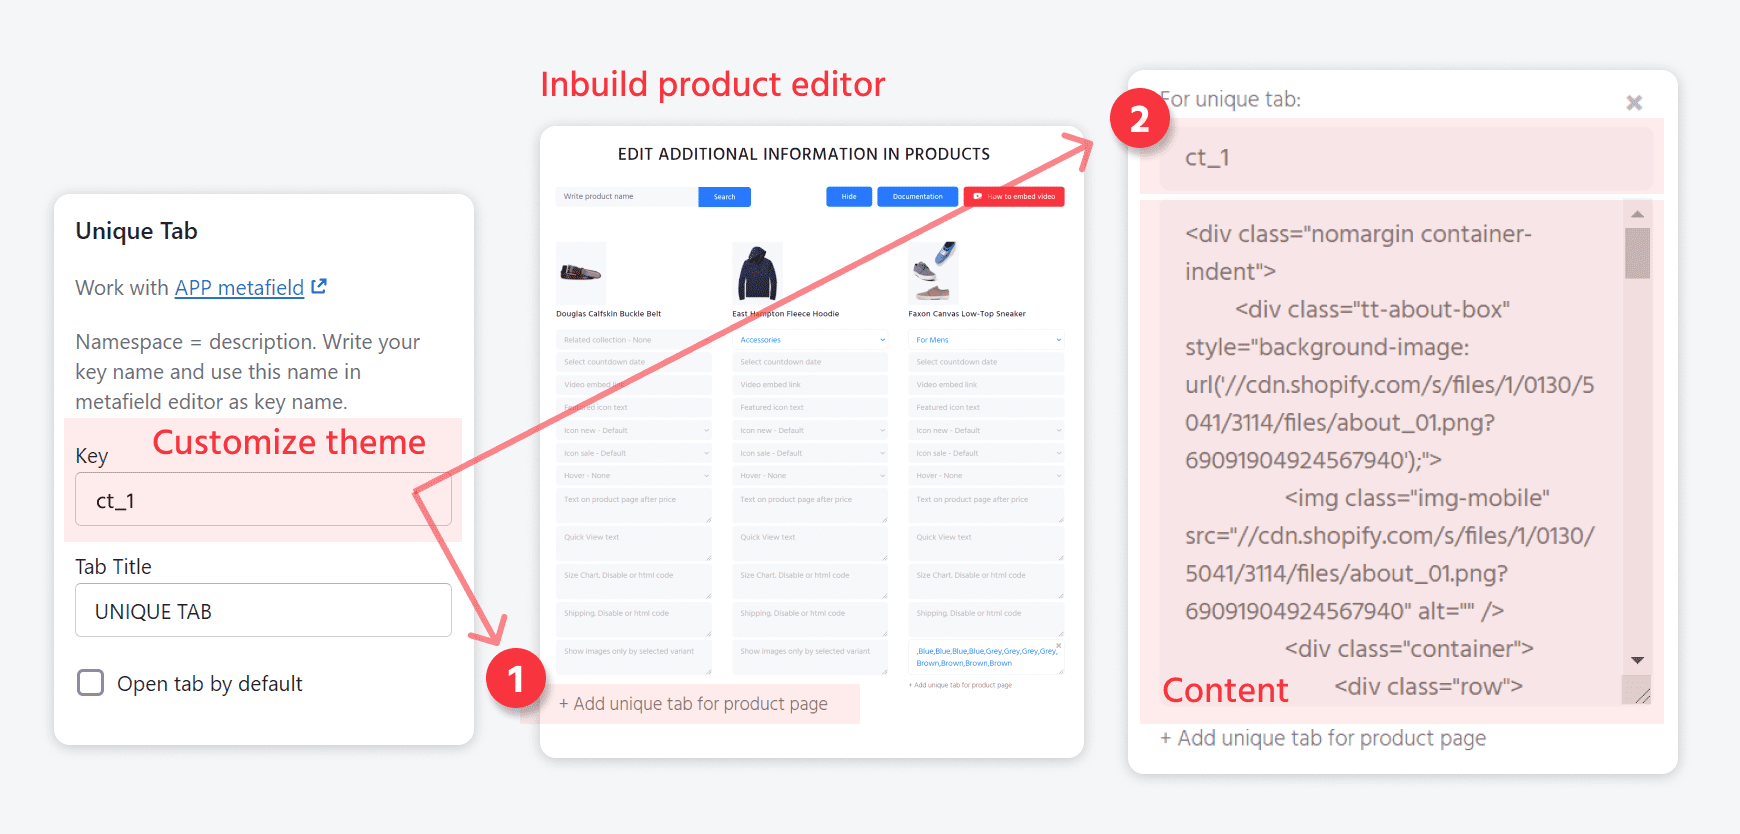
- Open Inbuild product editor
- Find the product you need to edit
- Click the button Add unique tab for product page.
- Key from product page: your name from section
- Value: your html content
- Save

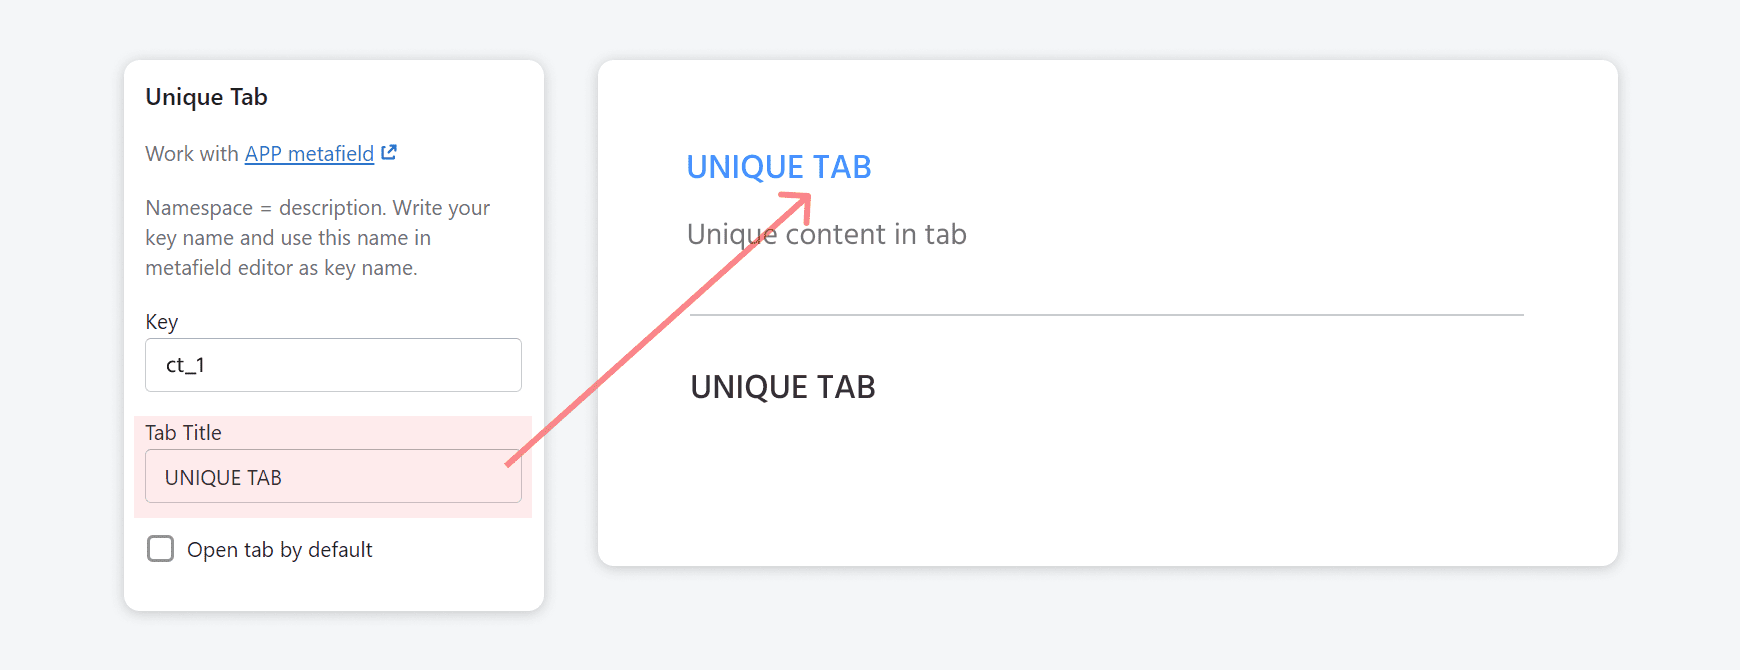
- Result
Unique Tabs. Old method
Unique TabsAdd filters
Add filters in shopify navigation admin panel Enable product filtering
Video instruction
Filter settings
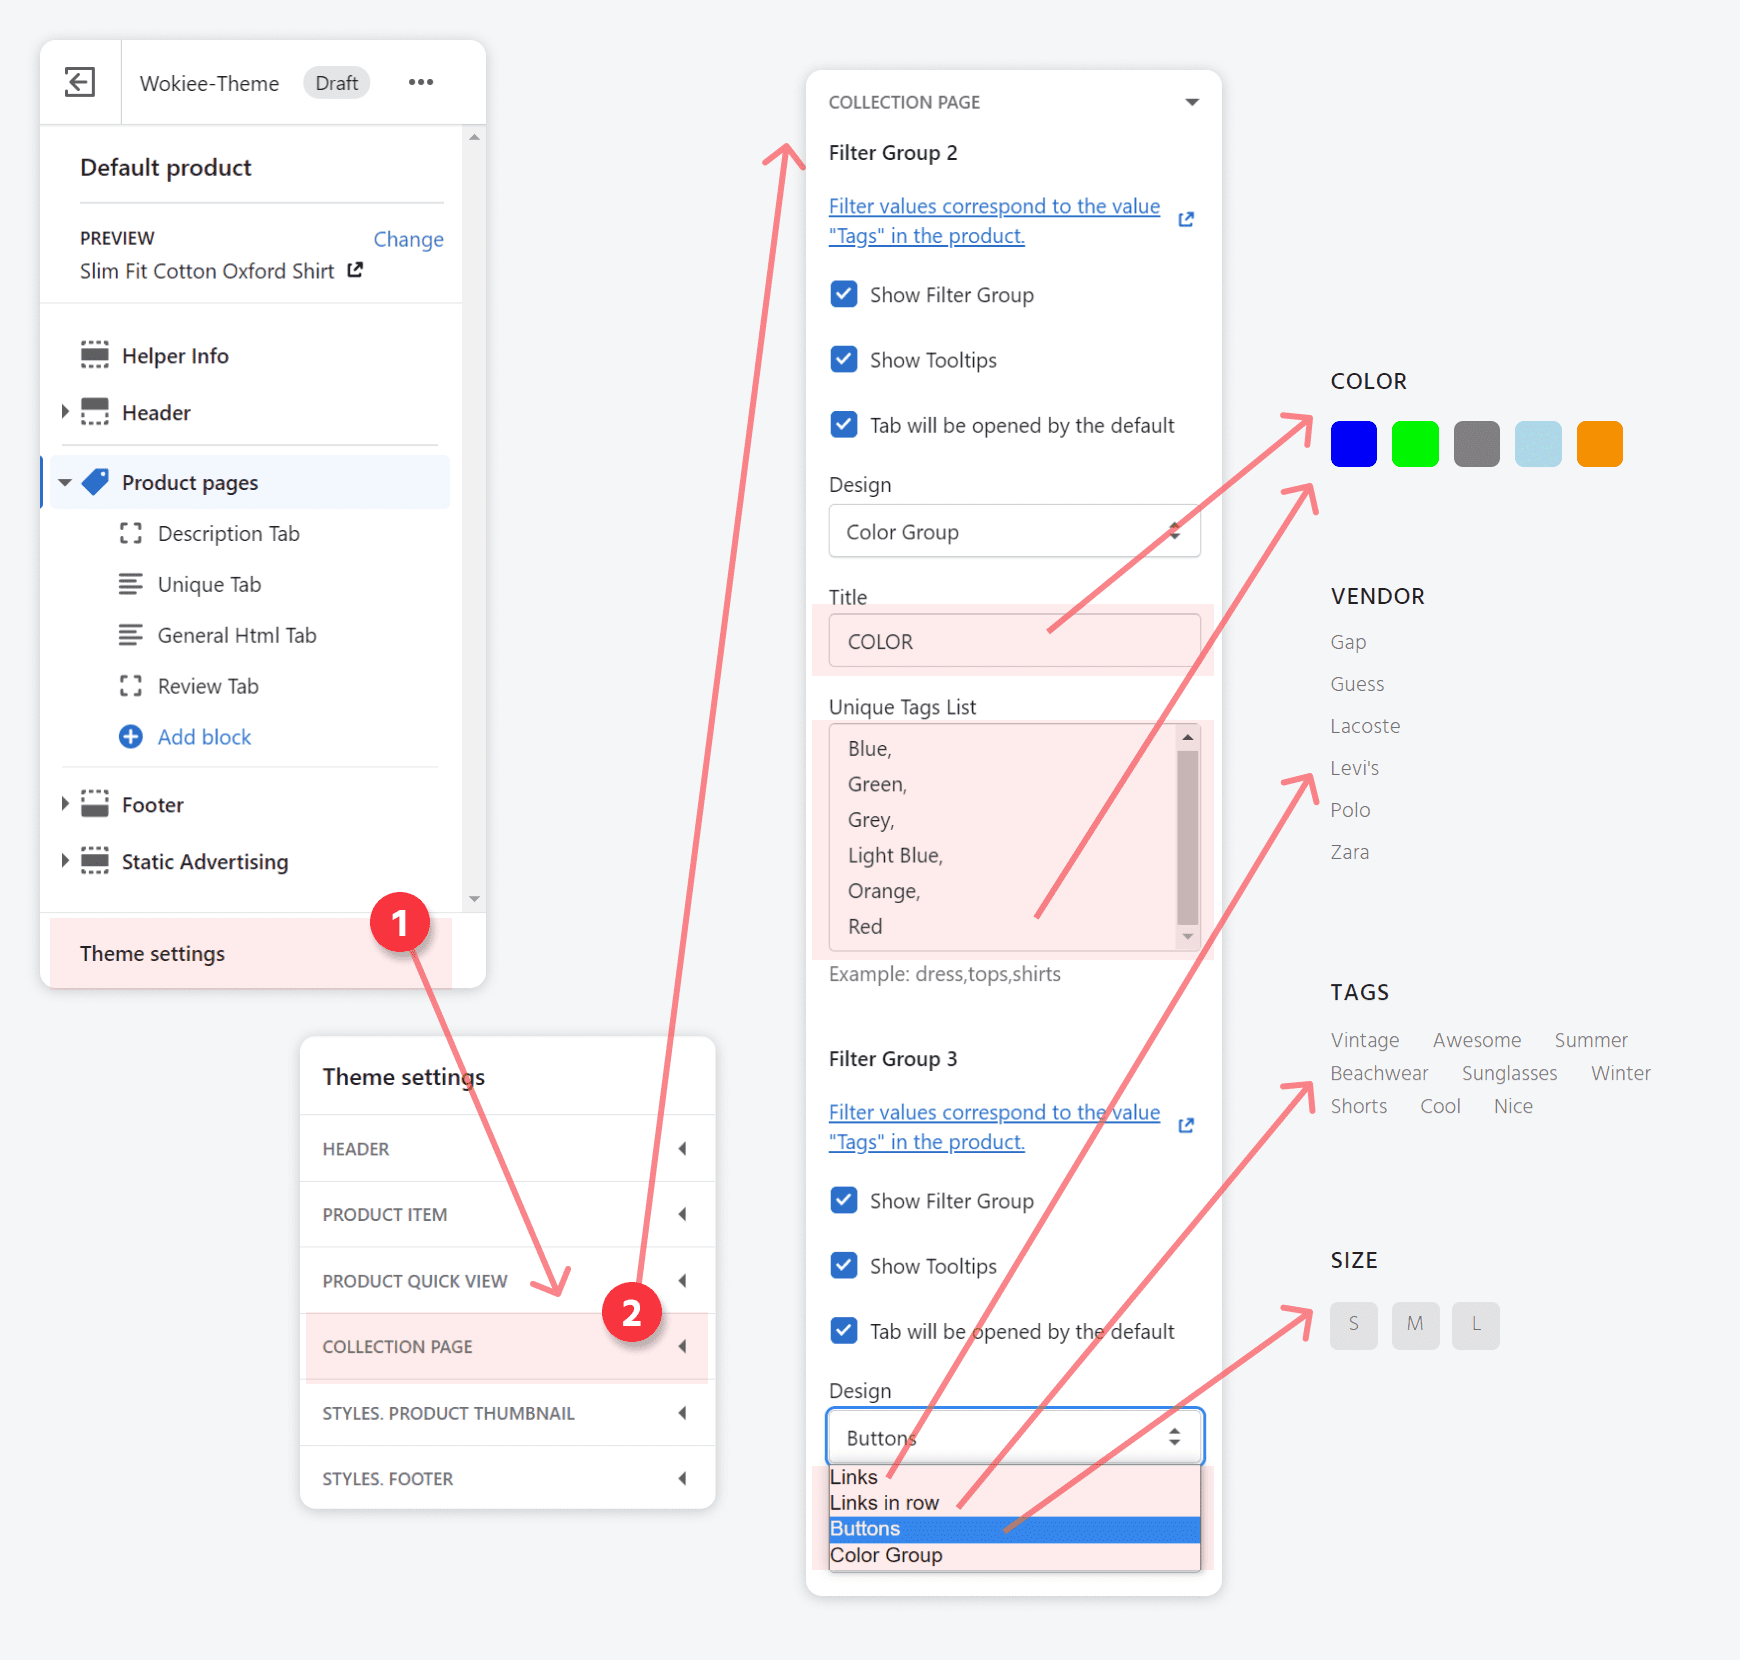
Real filter settings you can change in the collection page settings:

- Block options 1: You can set the title of the collection page tabs to uppercase. See image.
- Block options 2: Find the field Tabs will be closed by the default.
In a new window, open the shopify admin navigation bar. Scroll down to filters.
You need to select a filter name and copy the selected text.
Paste the copied text into the theme settings field The tab is closed by default. Separate all copied texts with commas. Example: Product type, Color, Brand
By default tabs on the collection page will be closed. See image. - Block options 3: Find the field Change tab name from navigation admin.
In a new window, open the shopify admin navigation bar. Scroll down to filters.
You need to select a filter name and copy the selected text.
Paste the copied text into the theme settings field Change tab name from navigation admin. Separate current filter name with this symbol _. Example: Brand_Vendor
Separate new copied texts with commas. Example: Brand_Vendor, Price_Price Range, Product type_Type
By default tabs on the collection page will have a new name. See image. - Block options 4: Find the field Show filter links as color.
In a new window, open the shopify admin navigation bar. Scroll down to filters.
You need to select a filter name and copy the selected text.
Paste the copied text into the theme settings field Show filter links as color. Separate all copied texts with commas. Example: Color, Material
Links on the collection page will appear as colored squares. See image. - Block options 5: Find the field Show filter links as buttons.
In a new window, open the shopify admin navigation bar. Scroll down to filters.
You need to select a filter name and copy the selected text.
Paste the copied text into the theme settings field Show filter links as buttons. Separate all copied texts with commas. Example: Size, Material
Links on the collection page will appear as buttons. See image.


In the block settings Price range styles you can change the design of the price filter. See image.

Additional filters based on tags
Add FiltersCurrently, you can use either Shopify filters or tags to make the collection page sidebar work properly.
Please be informed that if you do not have tags for your product, it won't be shown on your collection page with the Filter use.
Kindly note that you may use tags only with logical "AND", not with "OR". "AND" option means that all chosen tags are included in the product.
You can use additional filters as: sale product, popular tags, other. Tags must be duplicated from products in collection page settings in customize theme options.
The purpose of the description is to give an idea of how to organize additional filters.
- Write all the filters in product in the tags field: size, color, price, popular tags and other

- Go to Theme Customizer select “Theme Settings” tab and choose the Collection Page
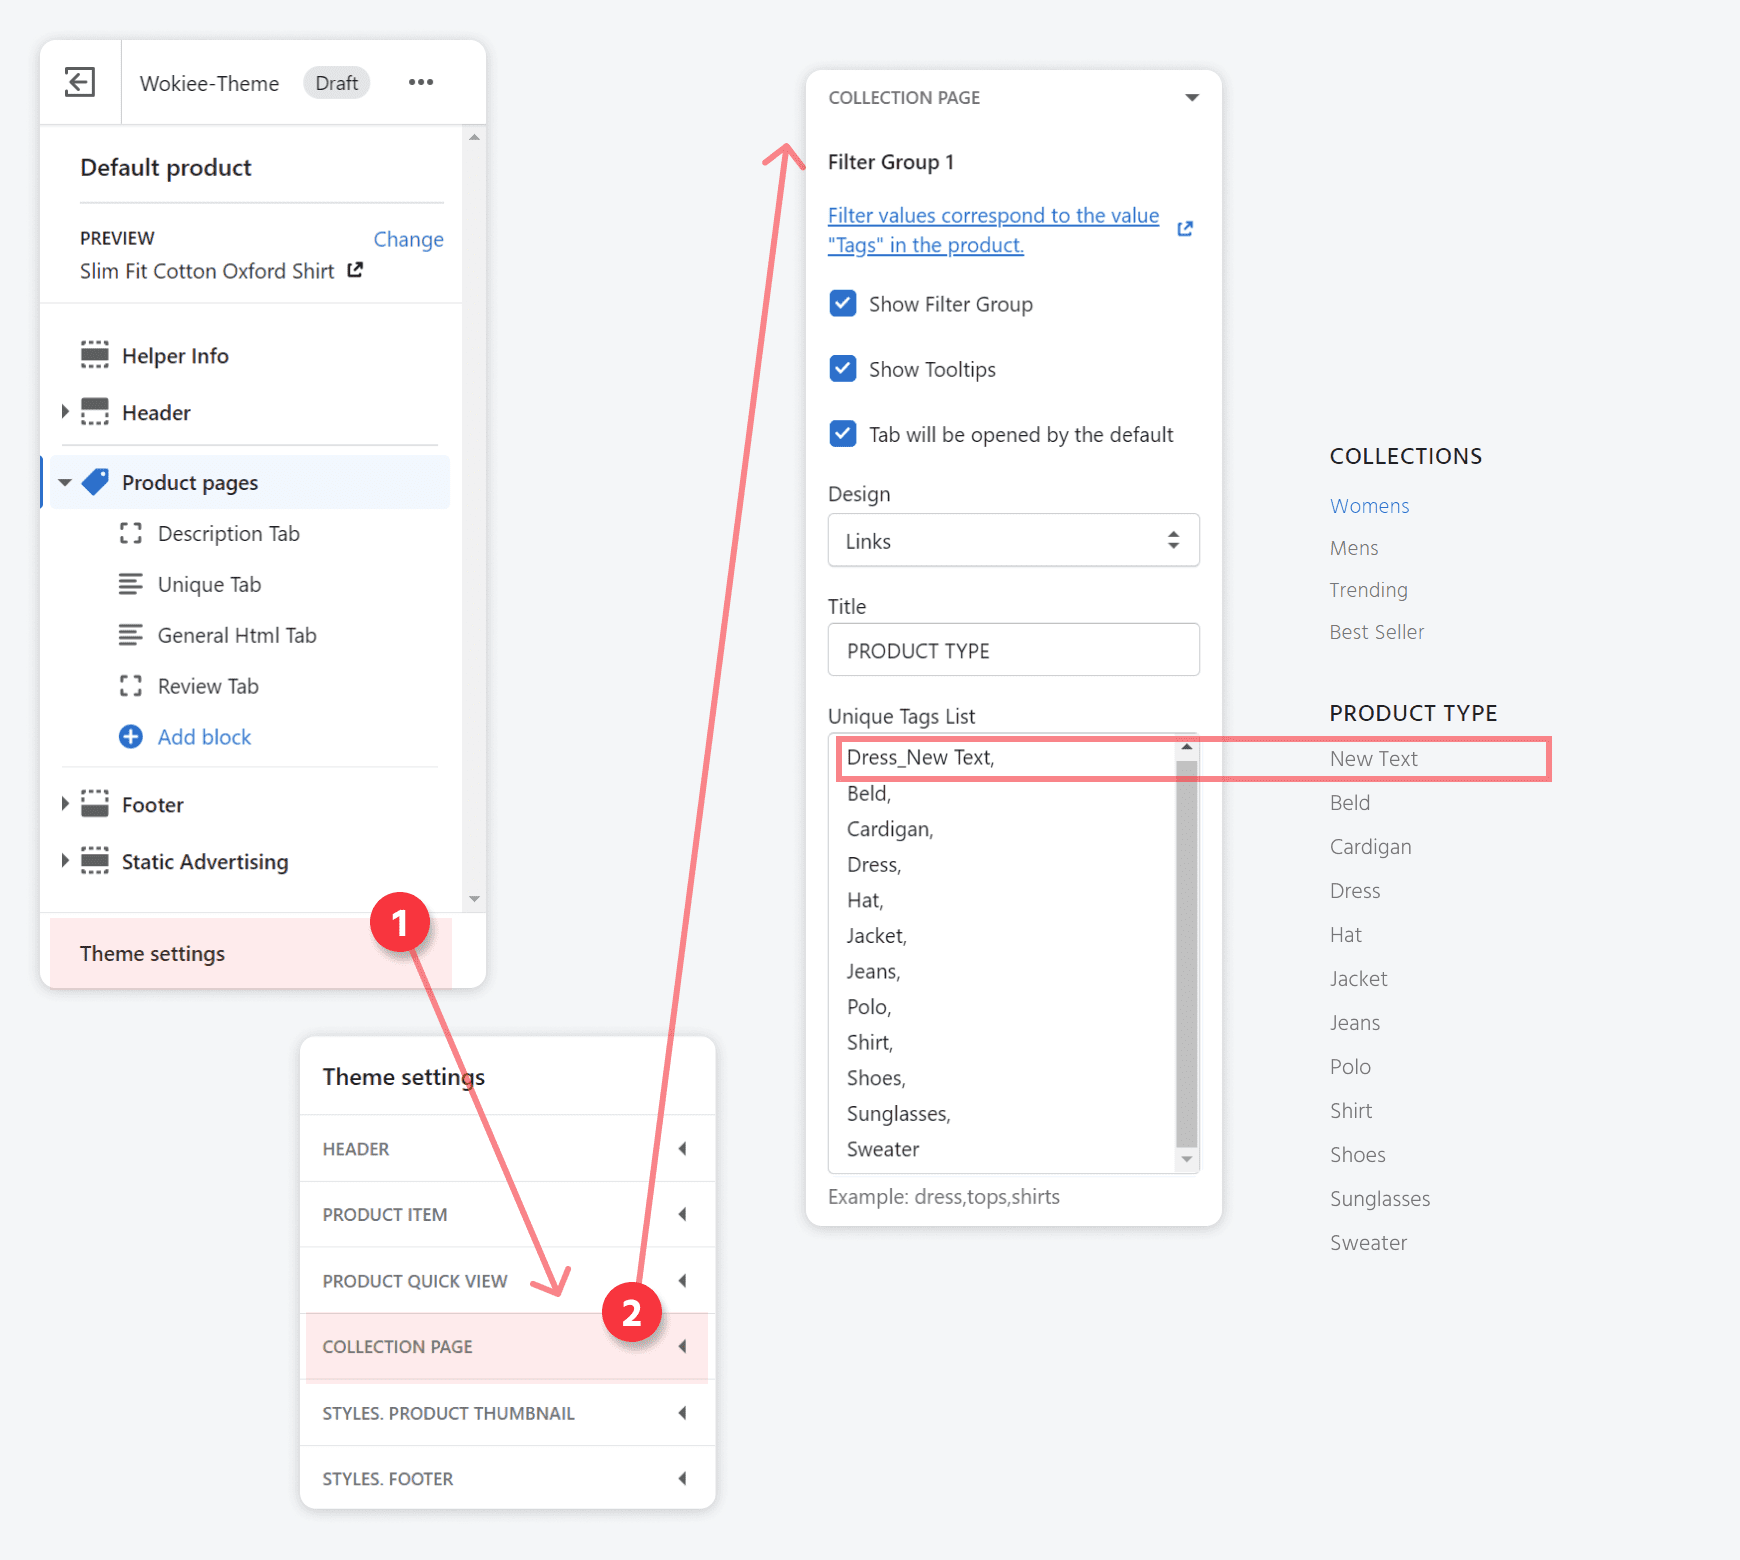
- Sort tags by filters groups. Example:


- You can translate tag in NON-LATIN characters.
Example: englishTag__Russian(Arabic, China, or else). Separate item from translate with two underline symbols


Product page tags
- From all written tags select Popular Tags
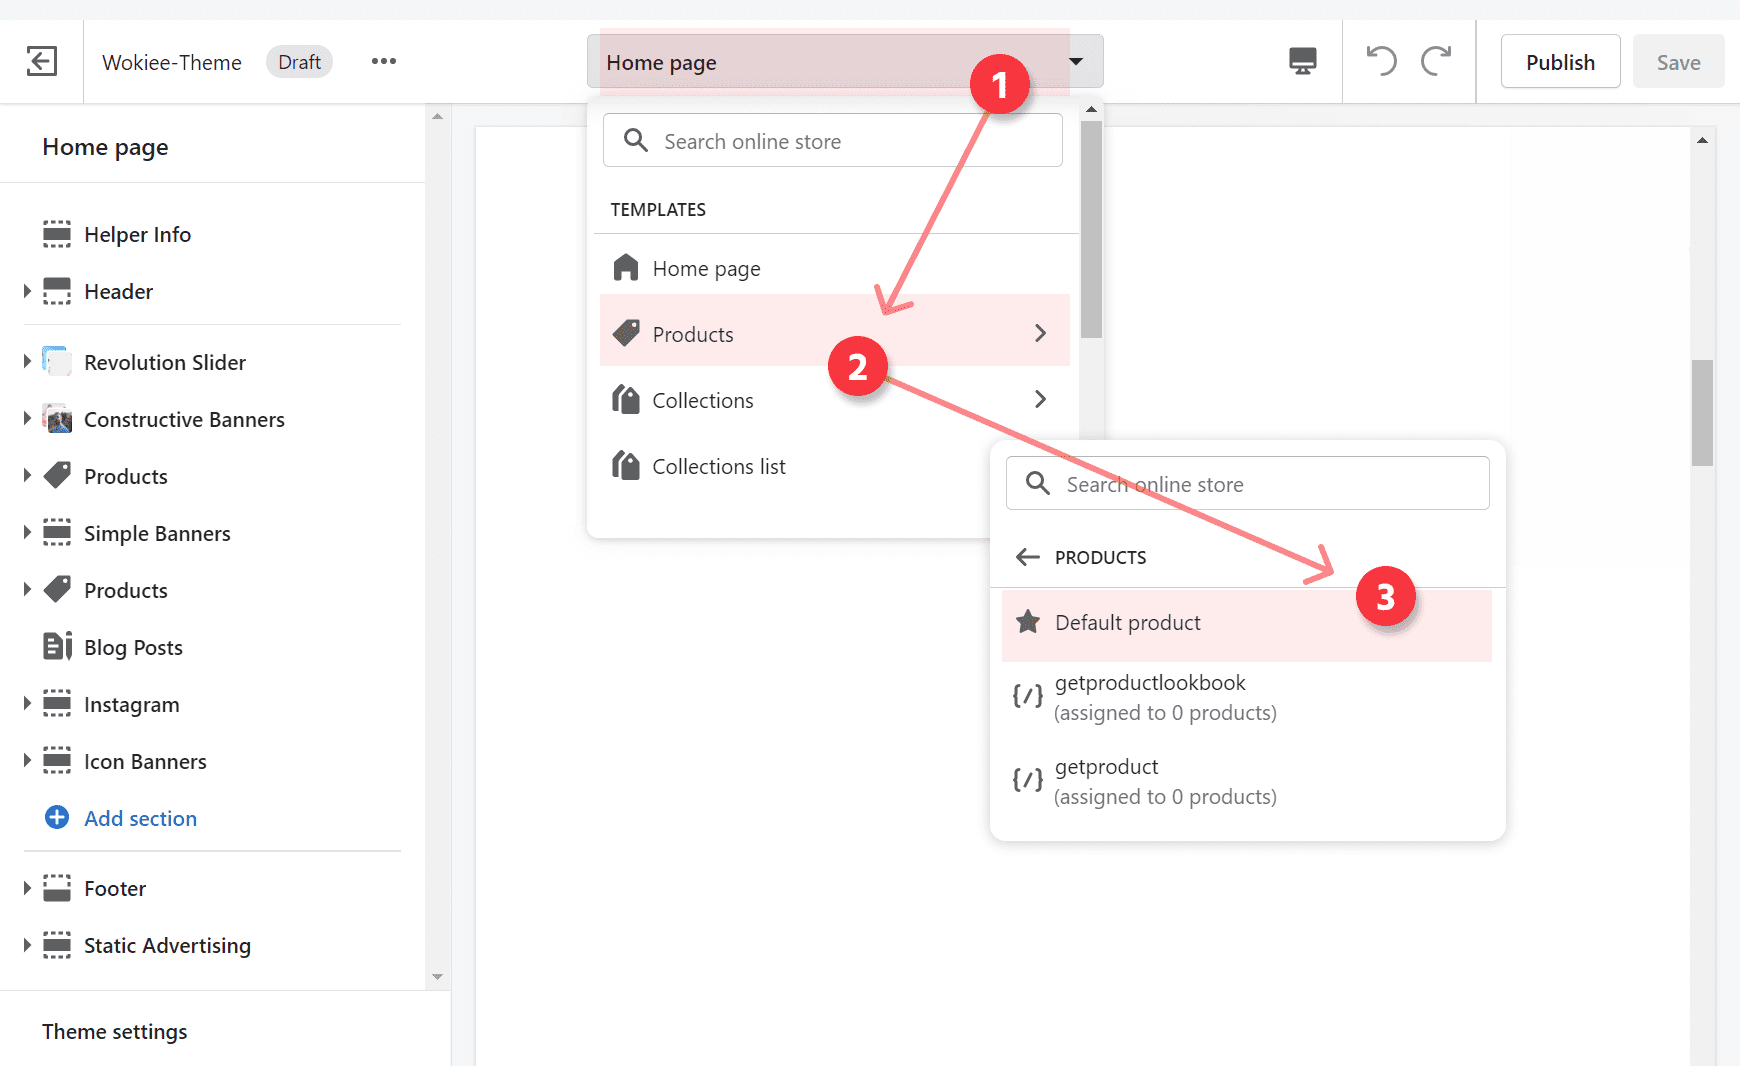
- Open Theme Customizer, on the Top of the screen, click on the Home page drop-down menu and select the “Product pages” option.
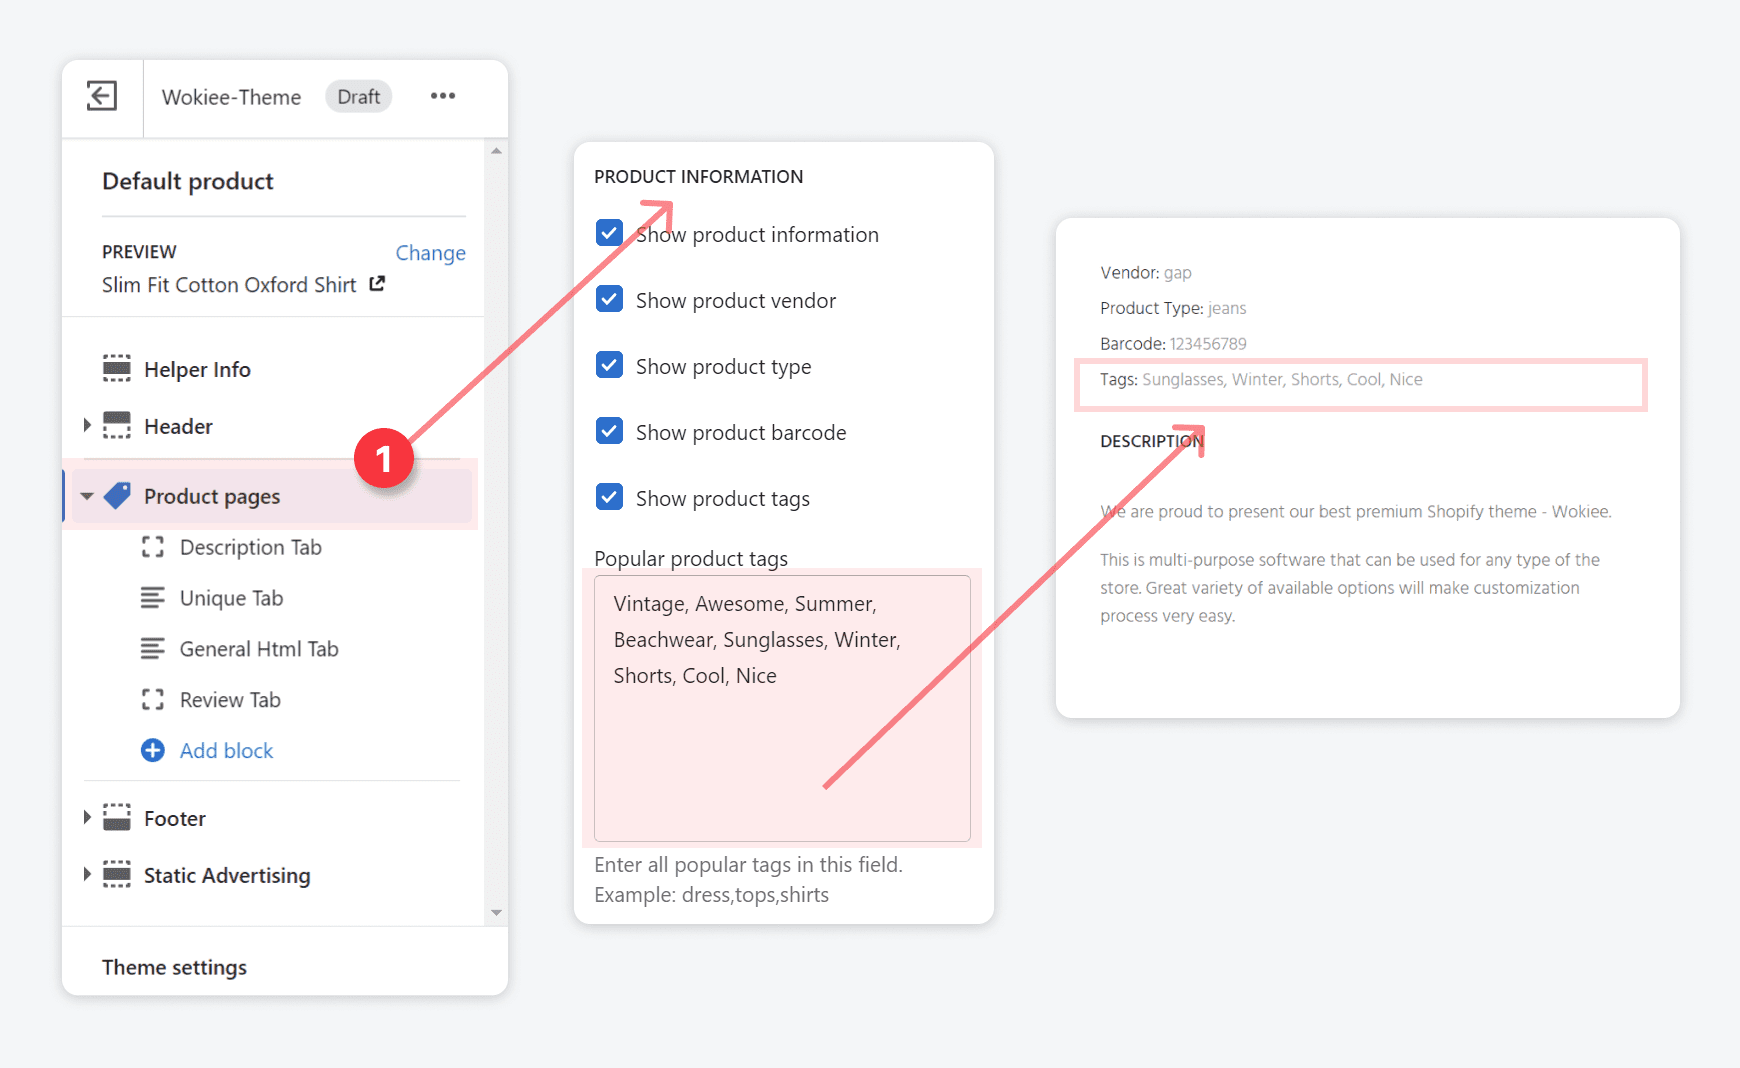
In the “Sections” tab click on the “Product pages” button.

- Scroll down to the “product information” section and in the “Popular product tags” field paste all popular tags suitable for your product:
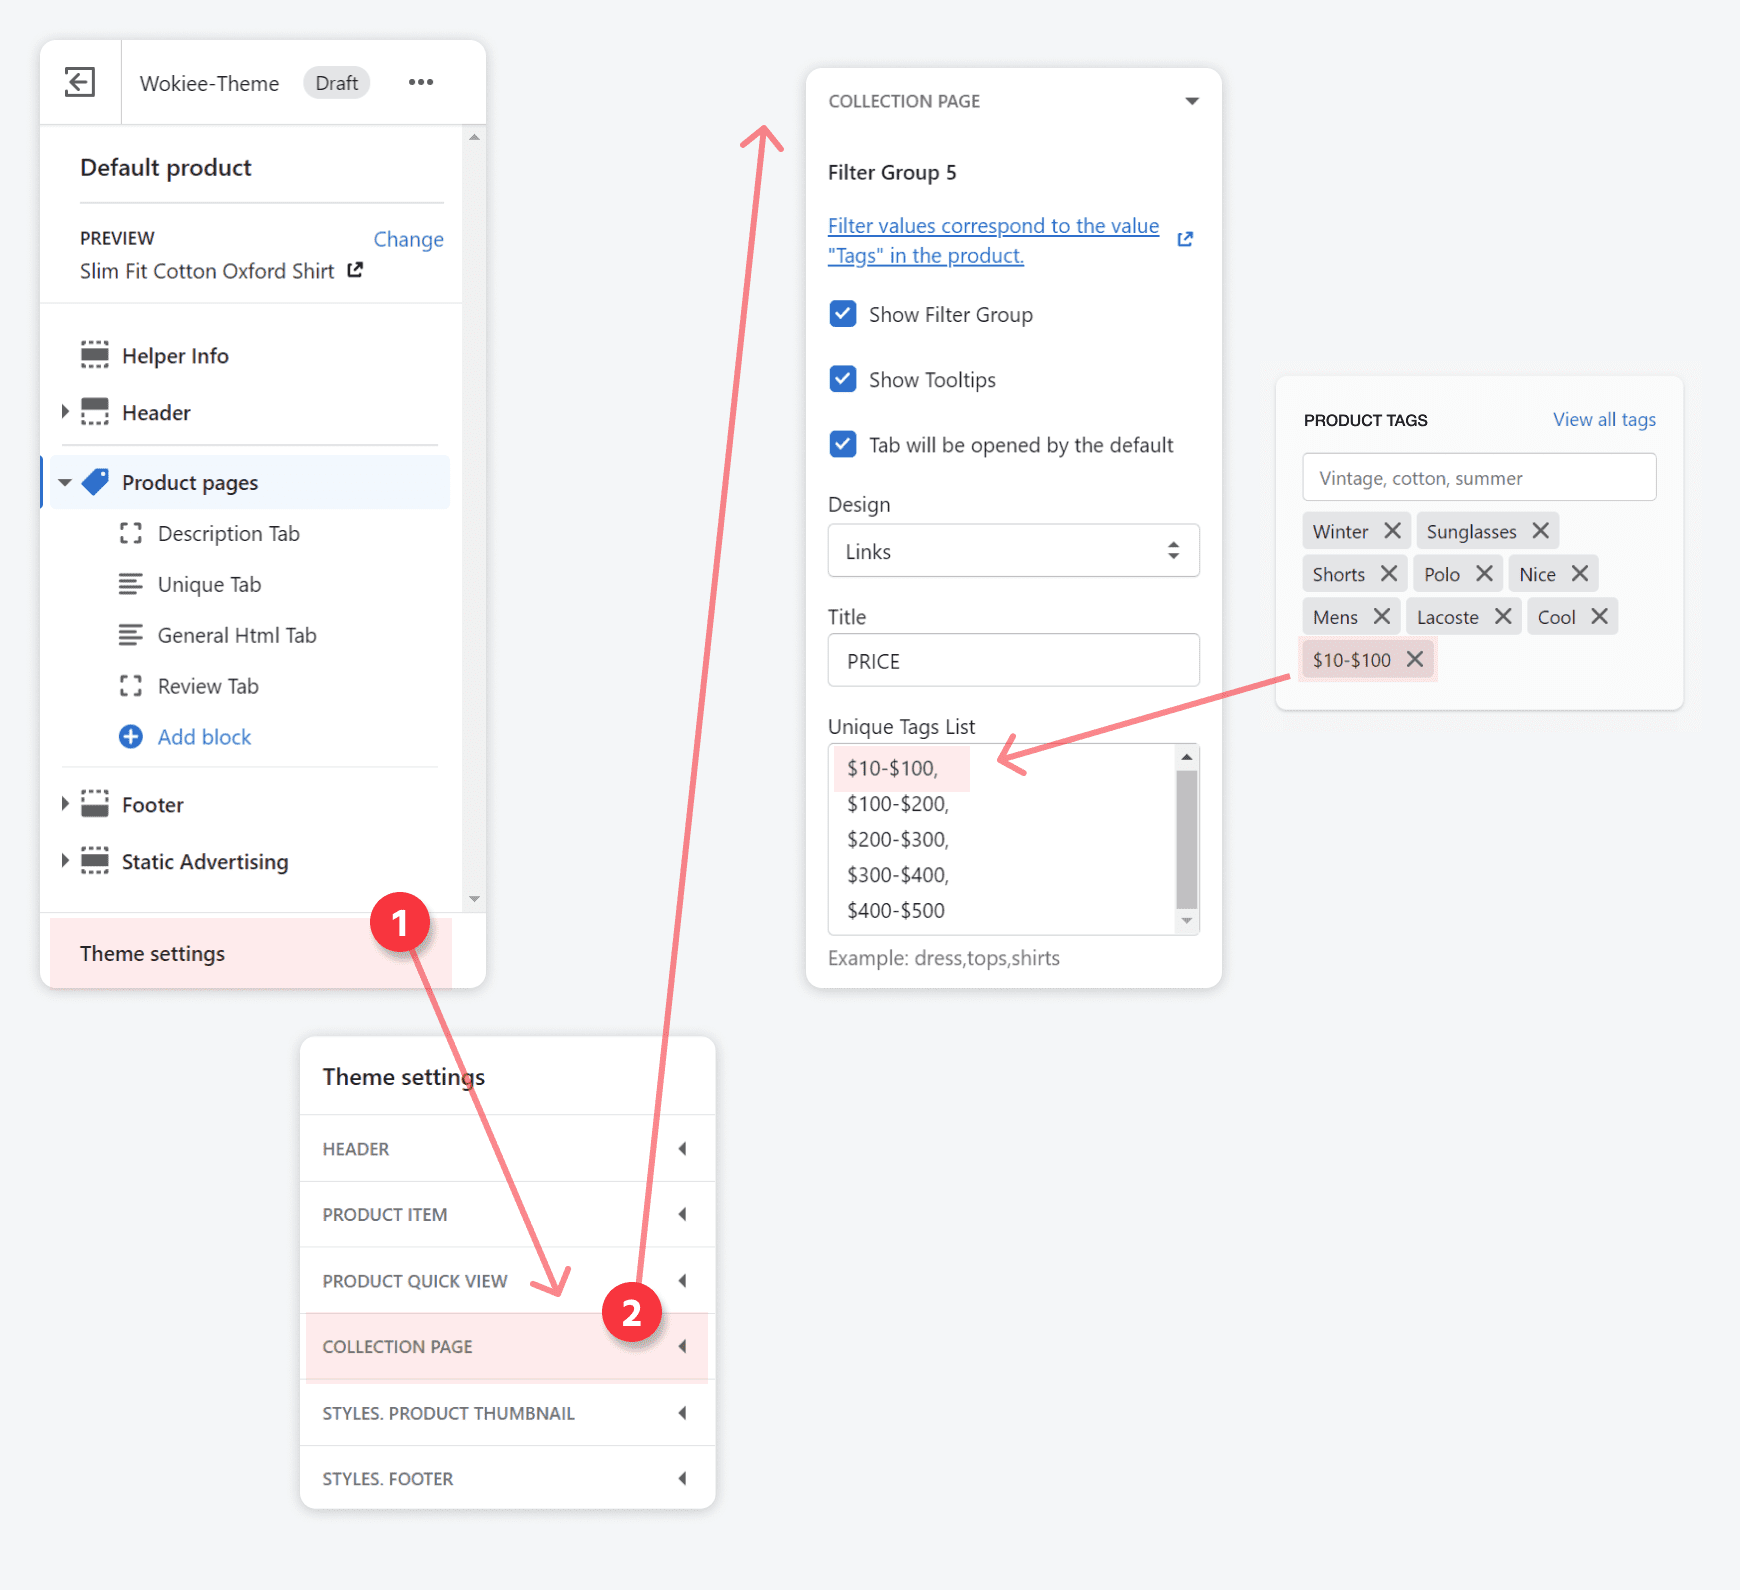
- Go to Customize theme > Theme settings > Collection page.
Duplicate the written tags for the collection page in the appropriate field:

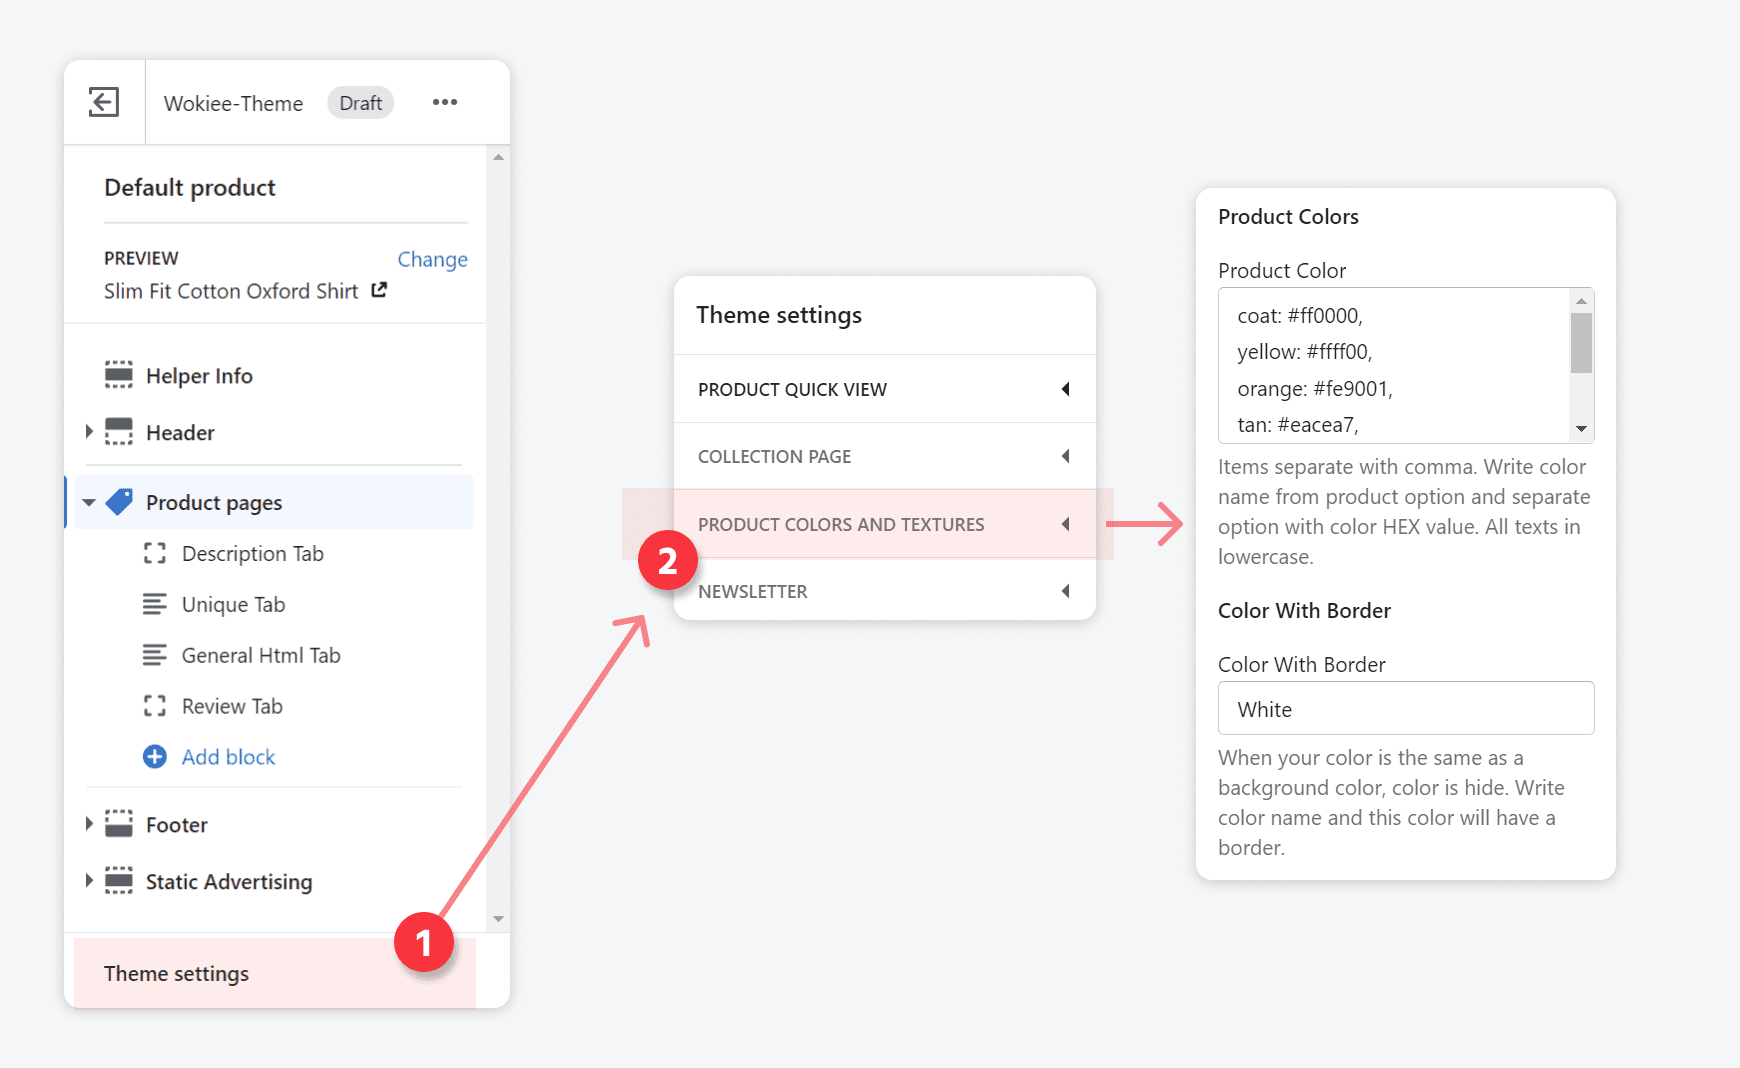
Colors and images
You may add new colors or images on the Theme Customizer page. You need to select “Theme settings" and choose “Product Colors and Textures” field.
- PRODUCT COLORS. Write color name and color code. Separate colors by comma.
- COLOR WITH BORDER. When color = background color you will have to add a border. Write color name and this color will have a border.
- ASSOCIATE PARAMETER WITH IMAGE. Write parameter name and upload image.

Compare
- You may enable or disable the “Compare” option in the Theme Customizer . You should select Theme settings and choose settings. Scroll down to the Compare in Theme option.
- You may change the text in the Edit Language option and choose the compare tab.
How to create compare description?
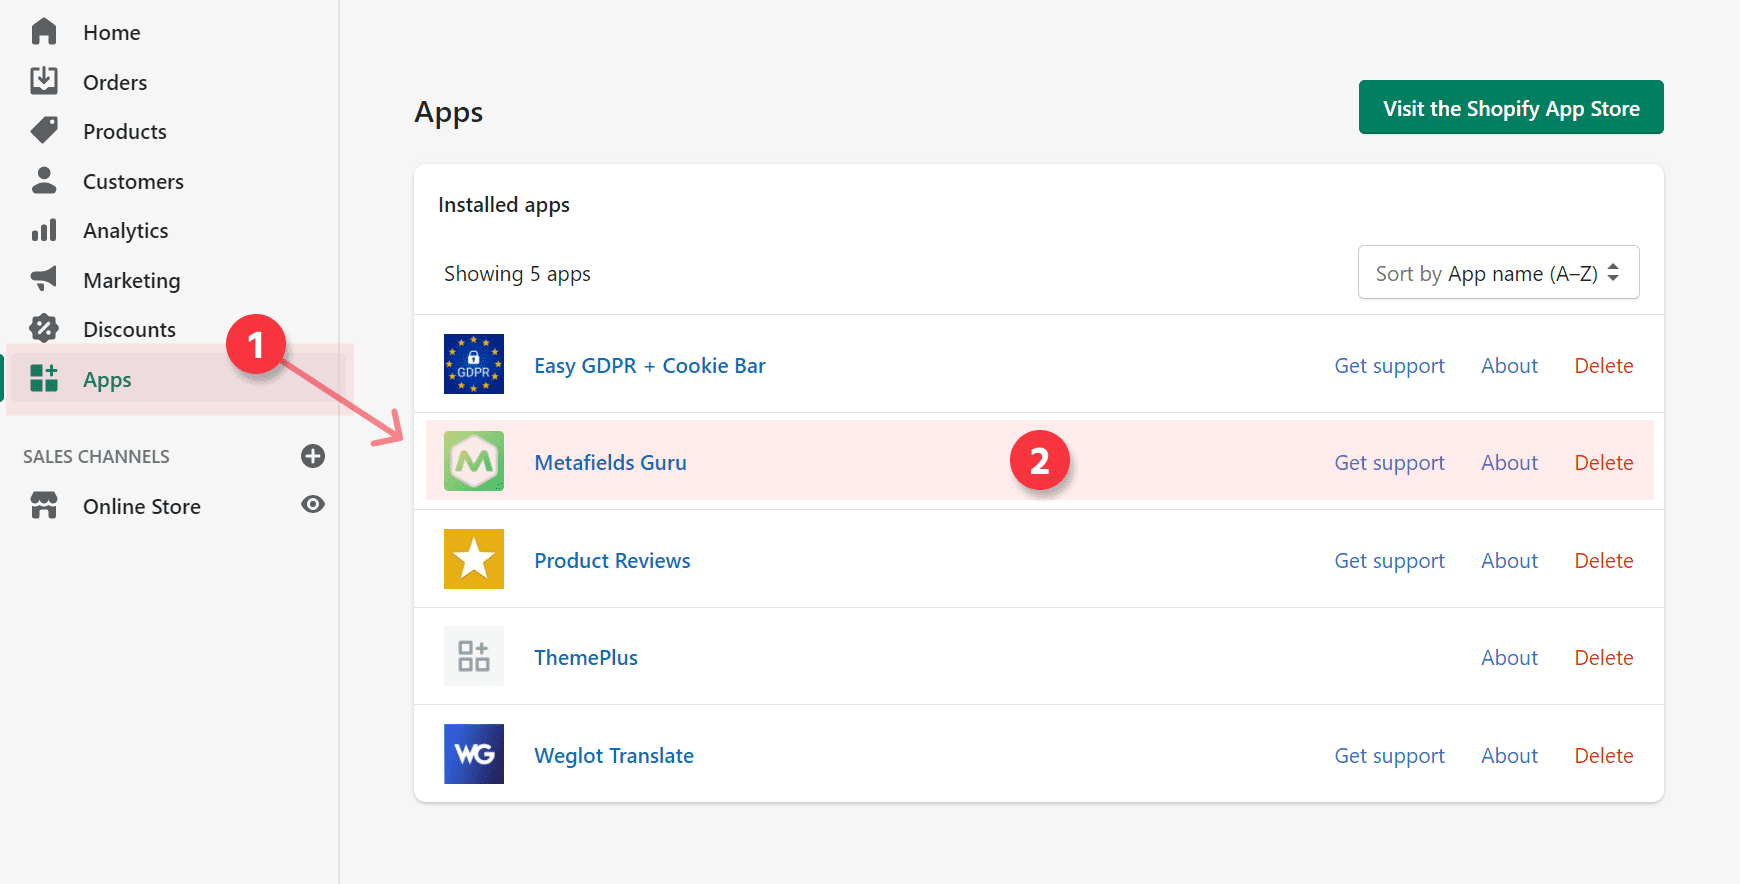
- Please install this metafield APP
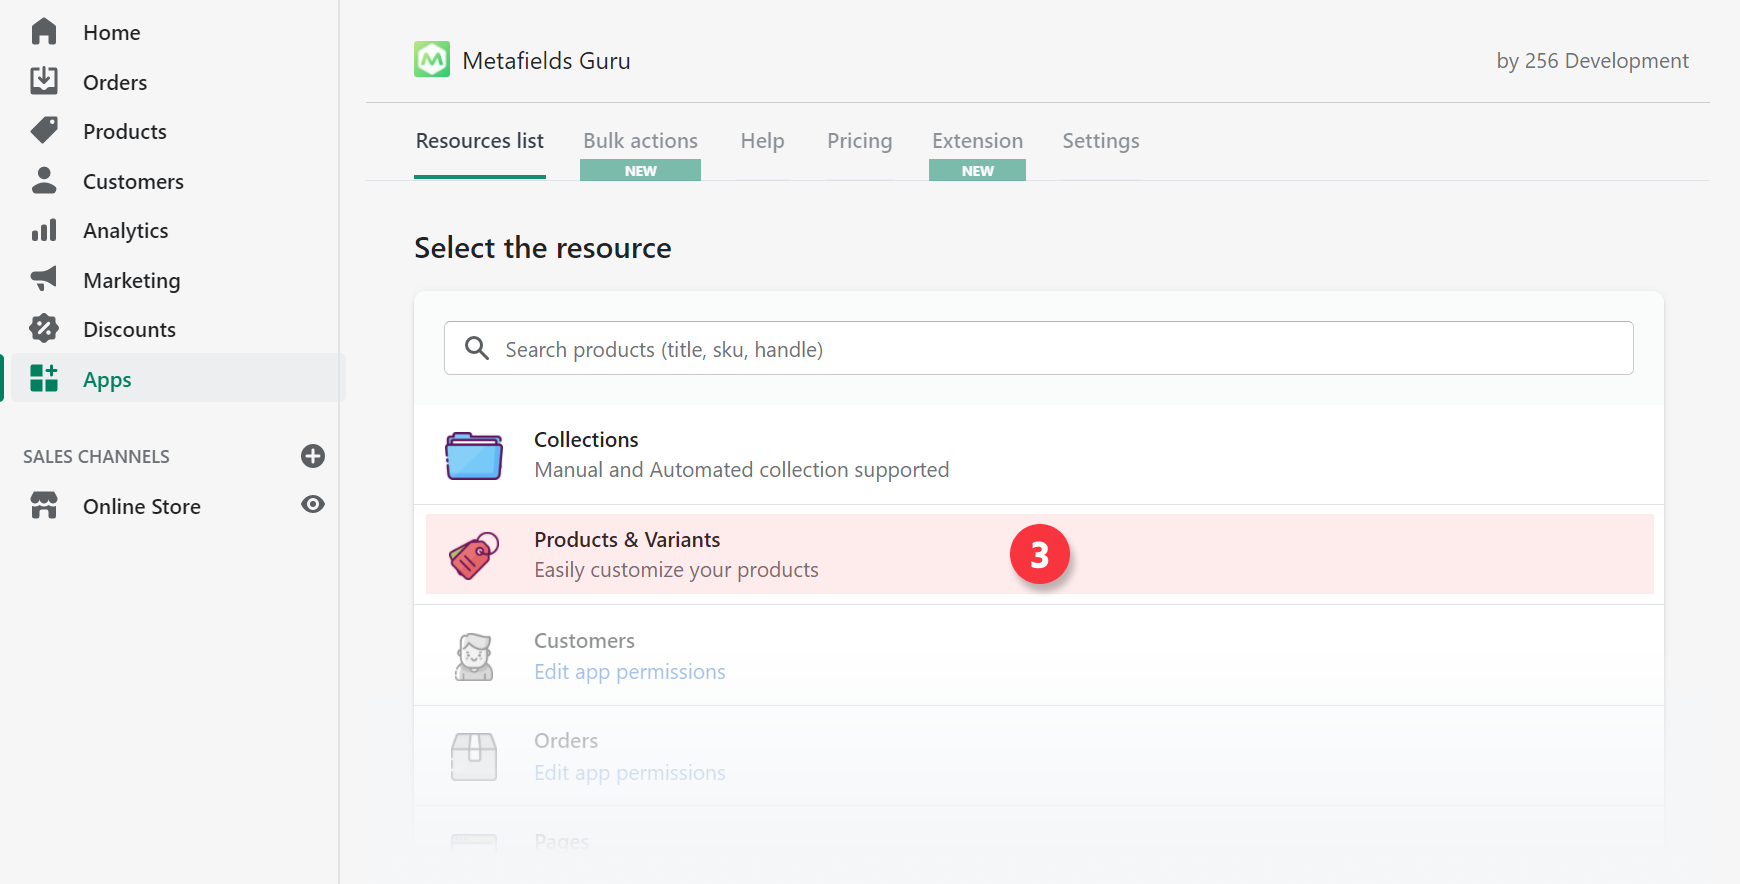
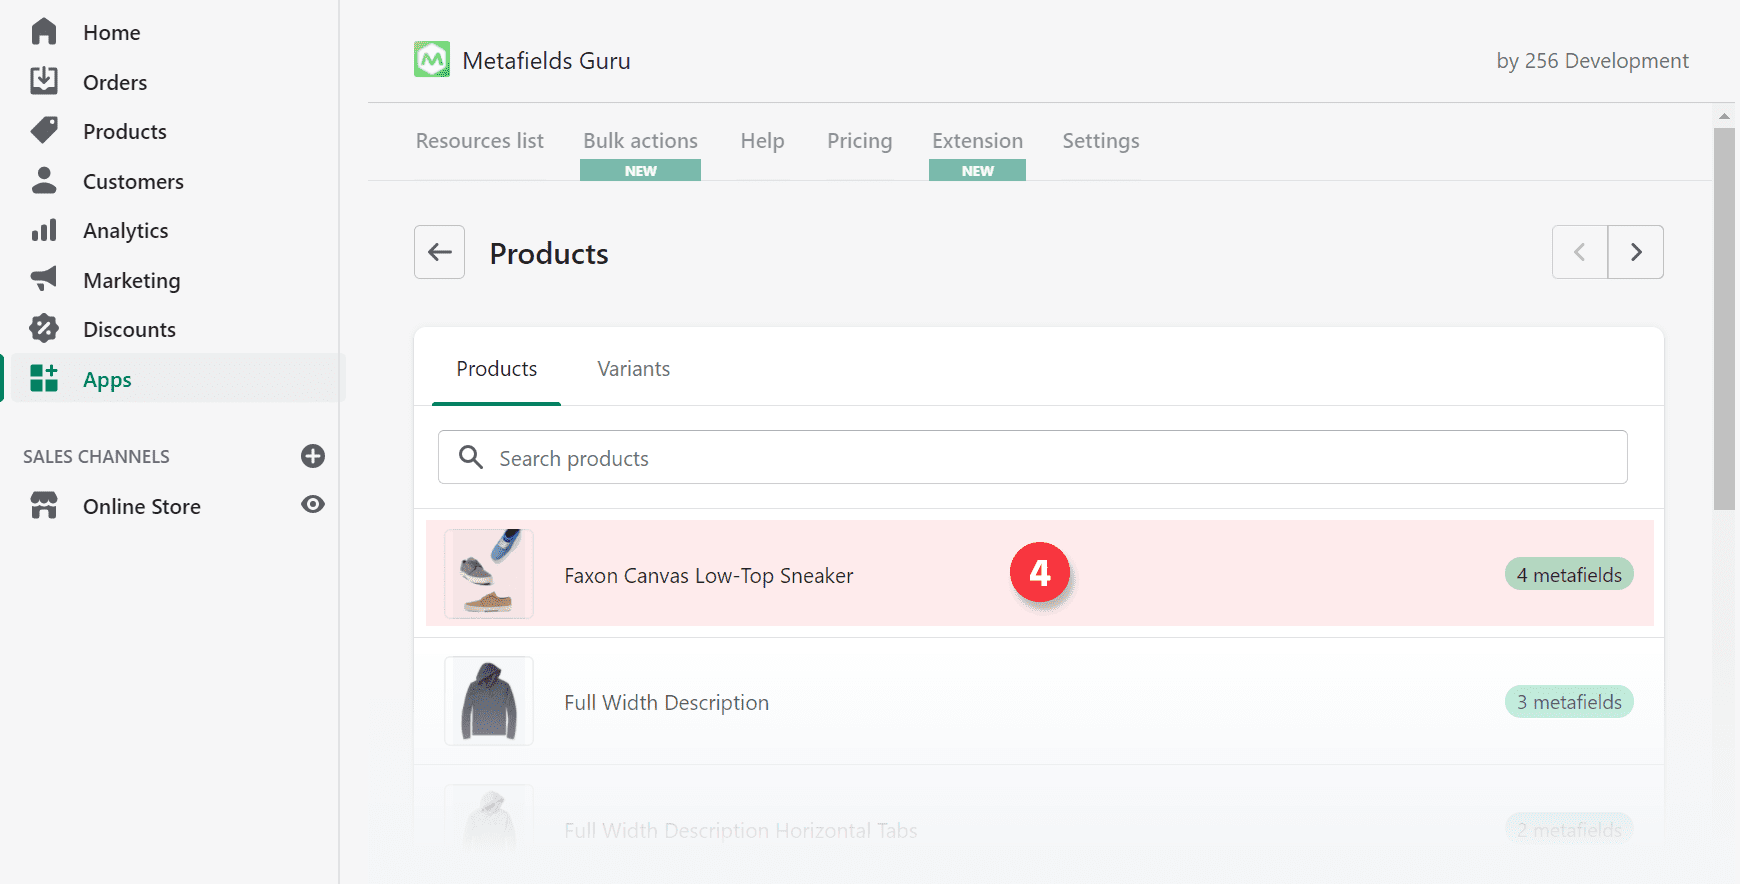
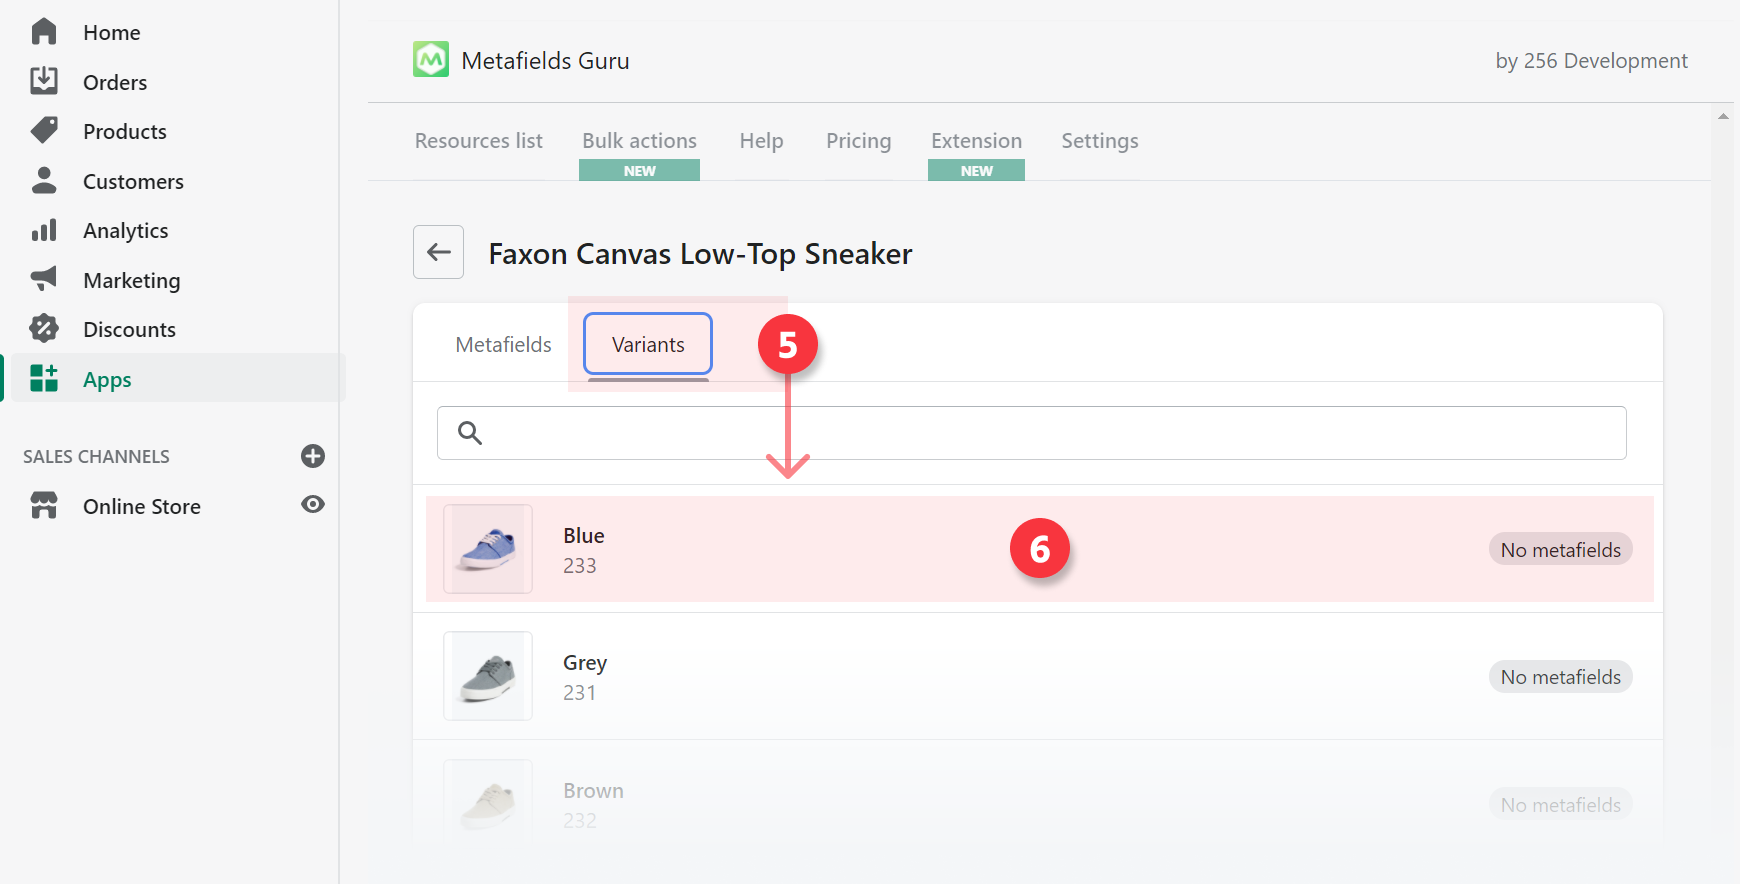
- Select the product you need to edit
- To make the same description for all variants of the product, you should add the Metafield.
Namespace: description
Key: small_description
Value: your texts
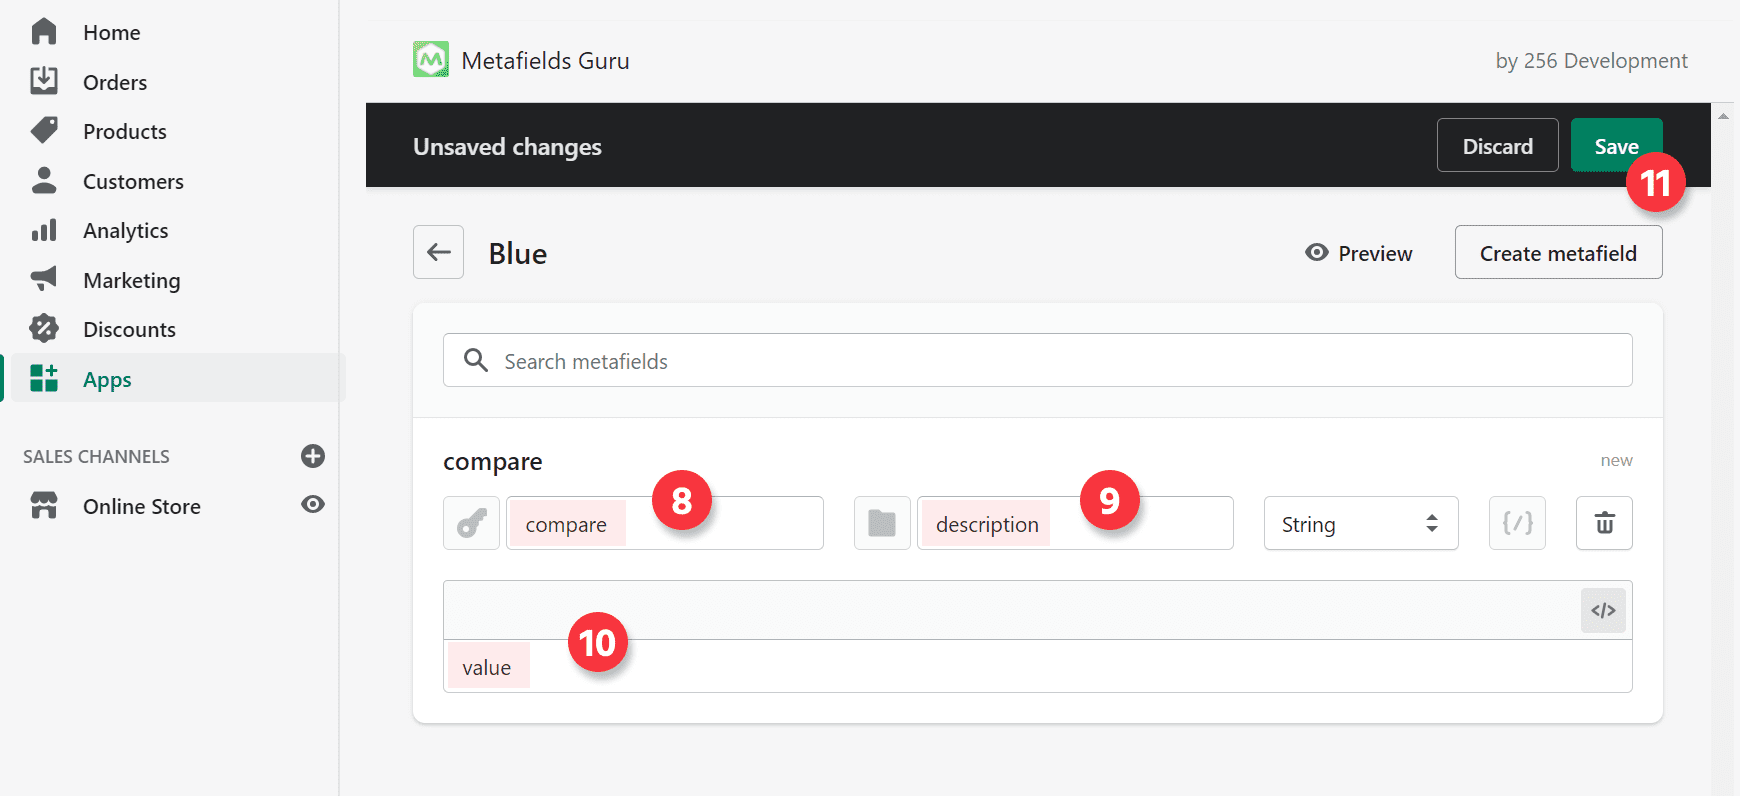
- To make different descriptions for all variants of the product add the Metafiled.
Namespace: description
Key: compare
Value: your texts


- If a product has both - a small_description and a variant compare description - the variant compare description will be shown.

How to create preorder product?
INSTRUCTIONShow images only by selected variant
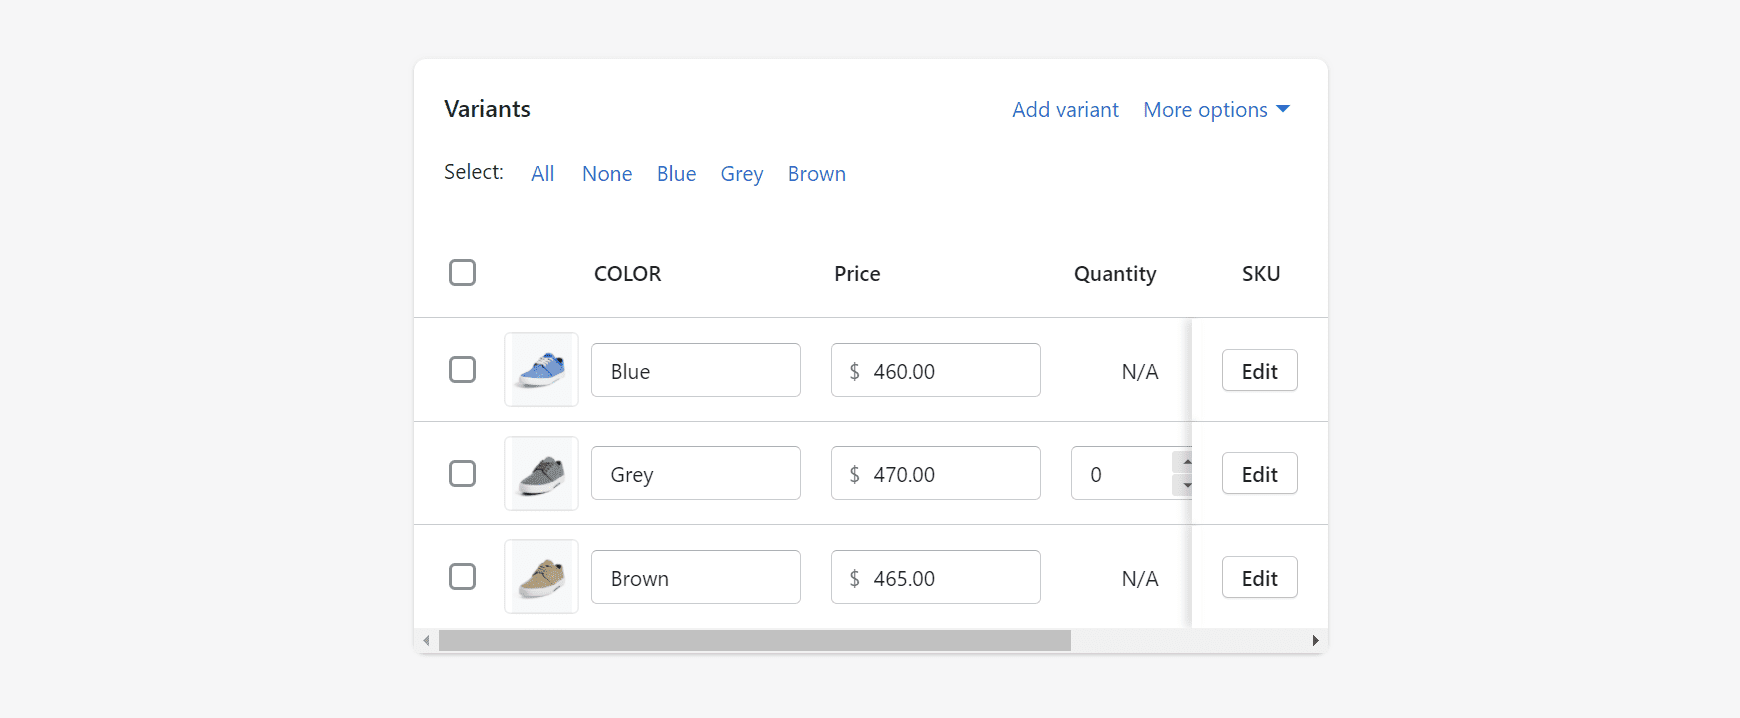
- Open your product in the Admin Panel
- Upload your images and group them by the color

- Set images for each variant

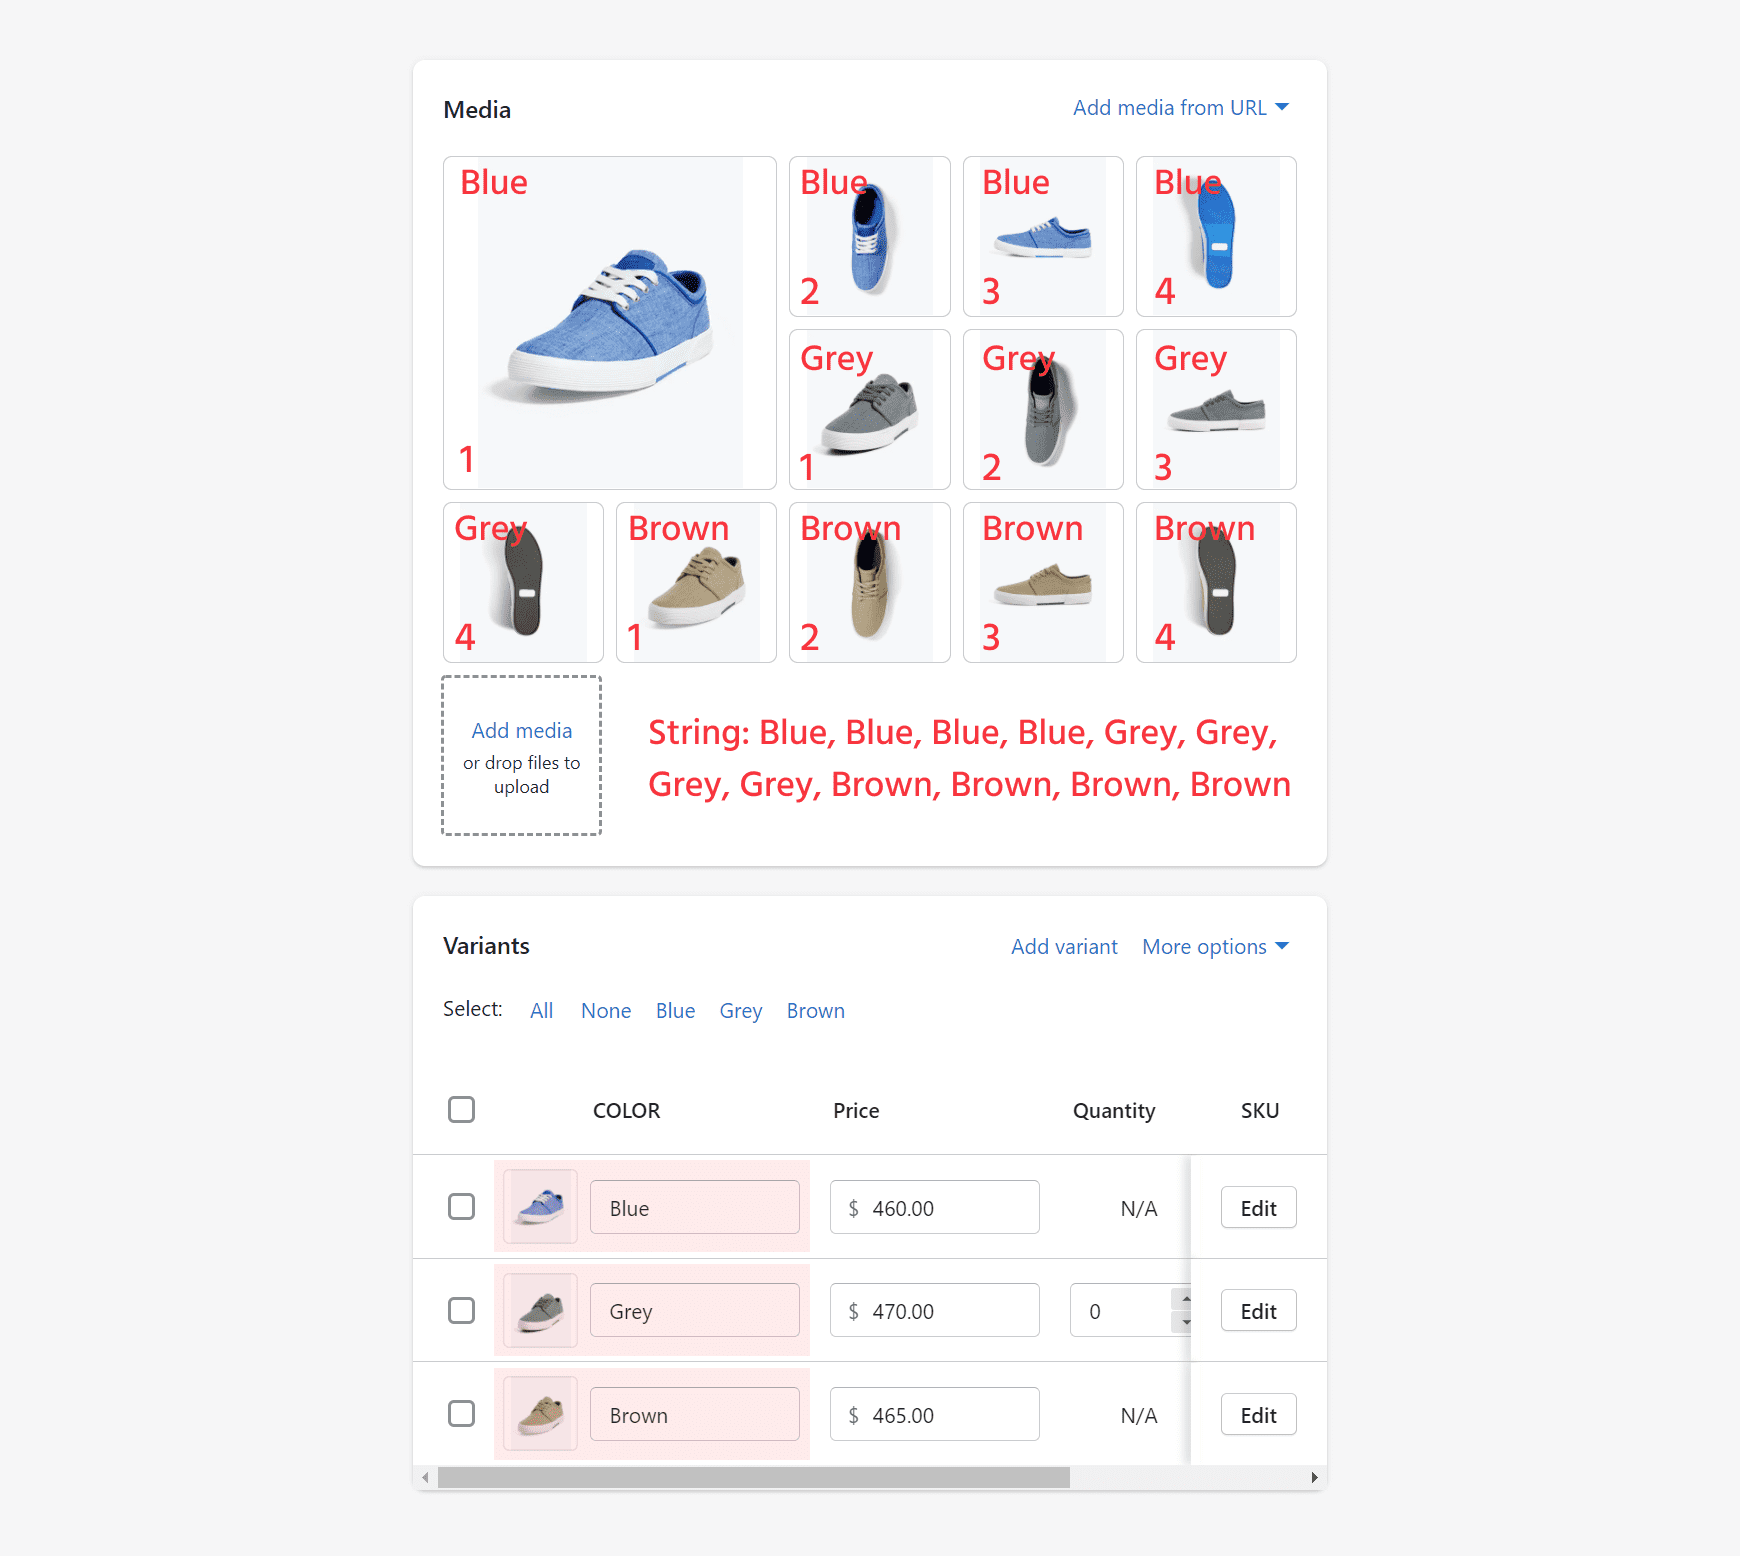
- Install the ExIm APP and create your secret page for metafield edits in products.
- Create string for metafield. Values separated by comma:
First option is color. Color values: Blue, Grey, Brown
In the image example are 12 images.
4 images = Blue
4 images = Grey
4 images = BrownAttention:Please do not use spaces with commaWe will list our pictures by color. We will separate them by comma:
Blue,Blue,Blue,Blue,Grey,Grey,Grey,Grey,Brown,Brown,Brown,Brown
Example:

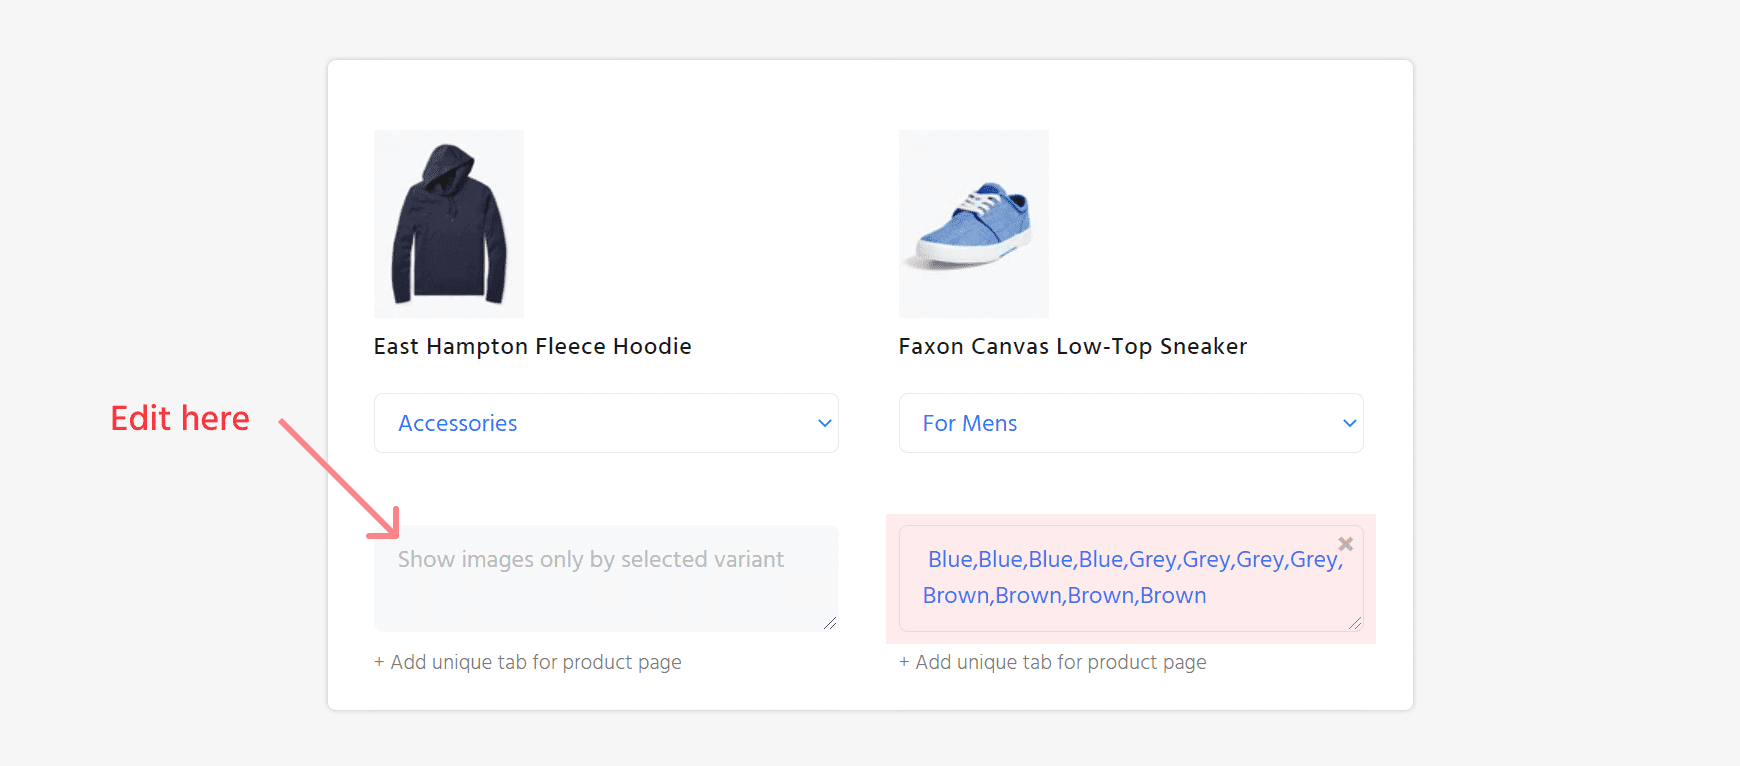
- Open Inbuild product editor
- Select product for edit
- Paste our created string in the field with name "Show images only by selected variant"
- Click button Save
- Add created metafield.
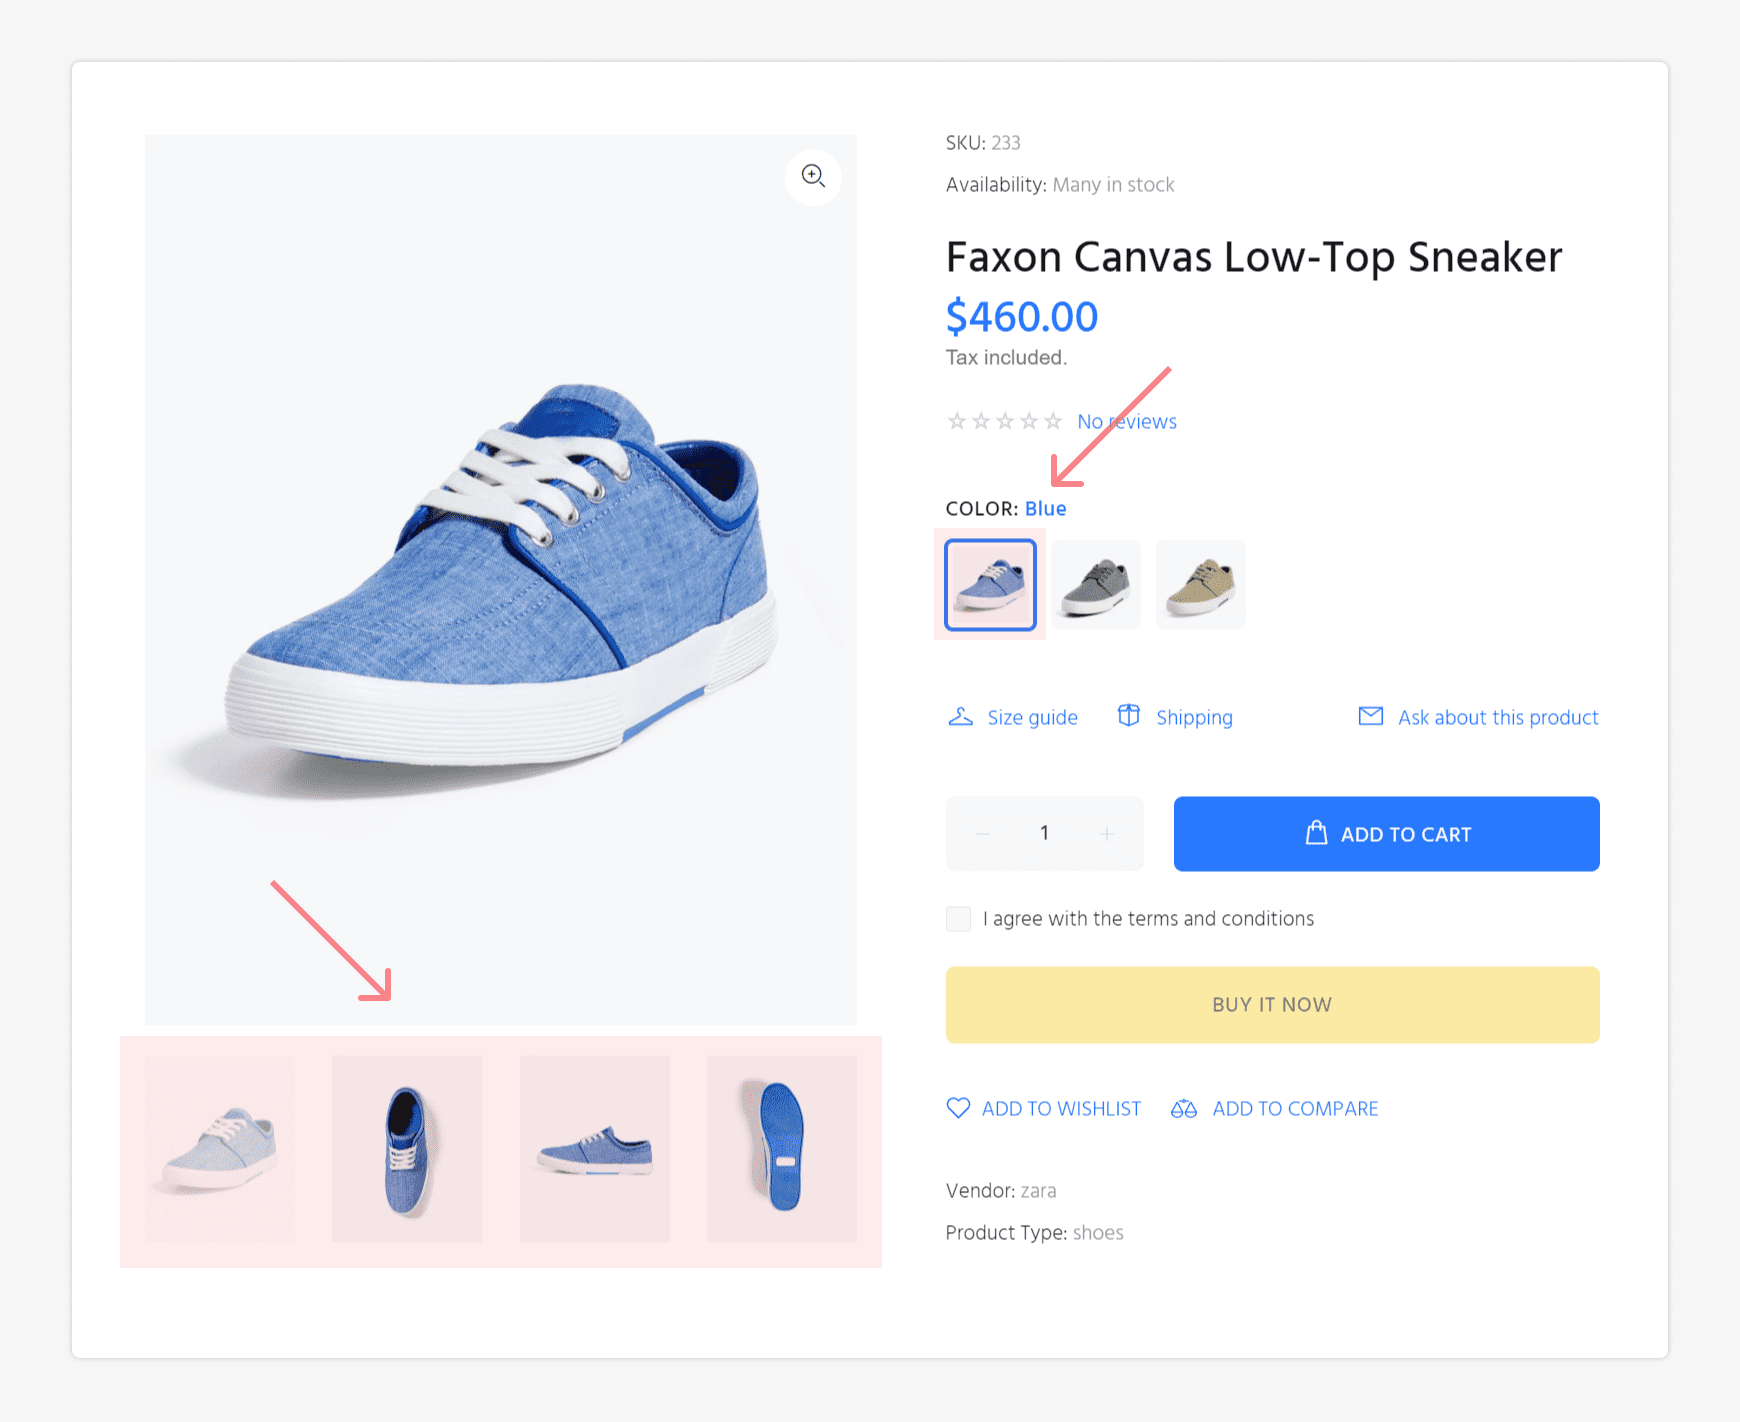
Result: